Not registered? Register for eCase
eCase administrators will have access to additional tabs within eCase that are used to perform administrative functions to control access to their organization's workers' compensation cases.
Assigning case access
An eCase administrator whose organization has a Board assigned ID number (i.e. R, T, W number) on notice in the case, can grant individuals or other organizations permission to access to all, or specific cases, in eCase. This provides organizations flexibility in using eCase while still maintaining confidentiality of workers' compensation cases pursuant to Section 110-a of the Workers' Compensation Law.
All case access
To grant access to all your organization's cases at the group or individual level:
- Select the Assign Case Access menu option. The administrators name, organization name, and any WCB IDs associated to the organization's eCase account will be displayed.

- Select Access to All Cases if not already selected by default.

- Select NYS/WCB Defined Group type. All organizations that have access to eCase can be accessed using NYS/WCB Defined Groups.
- Search for the name of organization to filter results of WCB defined groups and select the organization's name

- Grant access to all users of the organization, select the checkbox next to the organization name and select Save.
- Once you select Save, this will grant all case access to all users of that organization.
NOTE: Any new users the selected organization adds in the future will also have the same case access.
- Once you select Save, this will grant all case access to all users of that organization.
- Granting access to only specific individual(s) within an organization
- Select the arrow next to the organization name to see the users for the selected organization. Locate the user(s) you wish to grant all case access and check the box next to their name(s) and select Save.
- Once you select Save, this will grant all case access to only the selected users of that organization.
NOTE: Any new users you wish to grant access to in the future will need to be added through the same method.
If the eCase administrator wishes to remove the organizations or individual(s) eCase access in the future, the administrator may uncheck the box and select Save. This will remove access for all users of the organization or the individual user(s) depending on which method was used to grant all case access.
Case access to an individual case(s)
Grant access to a group or individual for specific cases:
- Select the Assign Case Access menu option. The administrators name, organization name, and any WCB IDs associated to the organizations eCase account will be displayed.

- Select Access to Individual Cases. The default selection is access to all cases.

- Select group type NYS/WCB Defined Groups
- Search for the name of organization to filter results of the WCB defined groups and select the organization name.

- Grant access to all users of the organization
- Select the checkbox next to the organization name.
- Select Add, enter the WCB Case ID and select Process.

- If you are a Party of Interest (POI) to the case, you will receive a confirmation message.
- Once you select Process, this saves your changes and will grant case access to all users of that organization for the specific cases identified. Any new users the selected organization adds in the future will also have the same case access.
Repeat for each case you wish to grant access to.- If the organization is receiving a POI error after you have granted them access, please verify you have checked the box next to the organization name. Also verify that the other organization you are granting access to has tried exiting eCase and re-authenticated for the change to take effect.
- Granting access to only specific individual(s) within an organization Select the arrow next to the organization name to view the organization's users.
- Select the checkbox next to the individual name(s).
- Select Add, enter the WCB Case ID and select Process.

- If you are a POI to the case, you will receive a confirmation message.
- Once you select Process, this saves your changes and will grant case access for the specific cases identified to only the selected users of that organization. NOTE: Any new users you wish to grant access to in the future will need to be added through the same method.
Repeat for each case you wish to grant access to.- If the organization is receiving a POI error after you have granted them access, please verify you have checked the box next to the organization name. Also verify that the other organization you are granting access to has tried exiting eCase and re-authenticate for the change to take effect.
- If you wish to view the users of the organization, you may select the arrow next to the organization name at any time.
Removing individual case access:
- To remove access to a specific case(s), similar to the previous steps for granting access, search for the organization and then select the organization or individual within the selected organization that was previously granted access.
- Select the Delete Case option, enter the WCB Case Number and select the Process button.
- Repeat this for each individual case you are removing from that organization or individual user's access.
Access to all BUT these cases
This option allows an organization to exclude certain cases from the view of an organization. For example, if granting access to your defense counsel and there were two sensitive cases an eCase administrator needed to exclude from their view, you could use this last option for granting case access to another organization. The functionality for adding and removing cases to the list is similar to the instructions above for access to individual cases. The only difference is when adding cases under the access to all but these cases, it will exclude them from the users view rather than allow them to view the case.
Locating organizations who are currently granted access to view cases
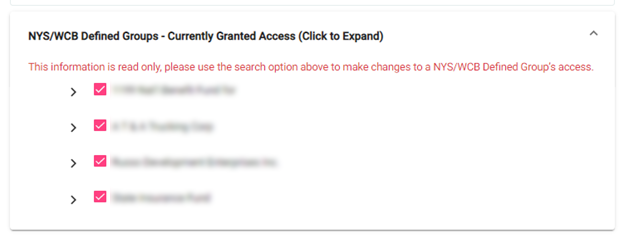
A read only section is provided for eCase administrators to review which organizations you have granted eCase access to on behalf of your organization. This information loads automatically while on the Assign Case Access Tab and will change based upon the radio button you select for the level of case access being granted.

Custom user groups
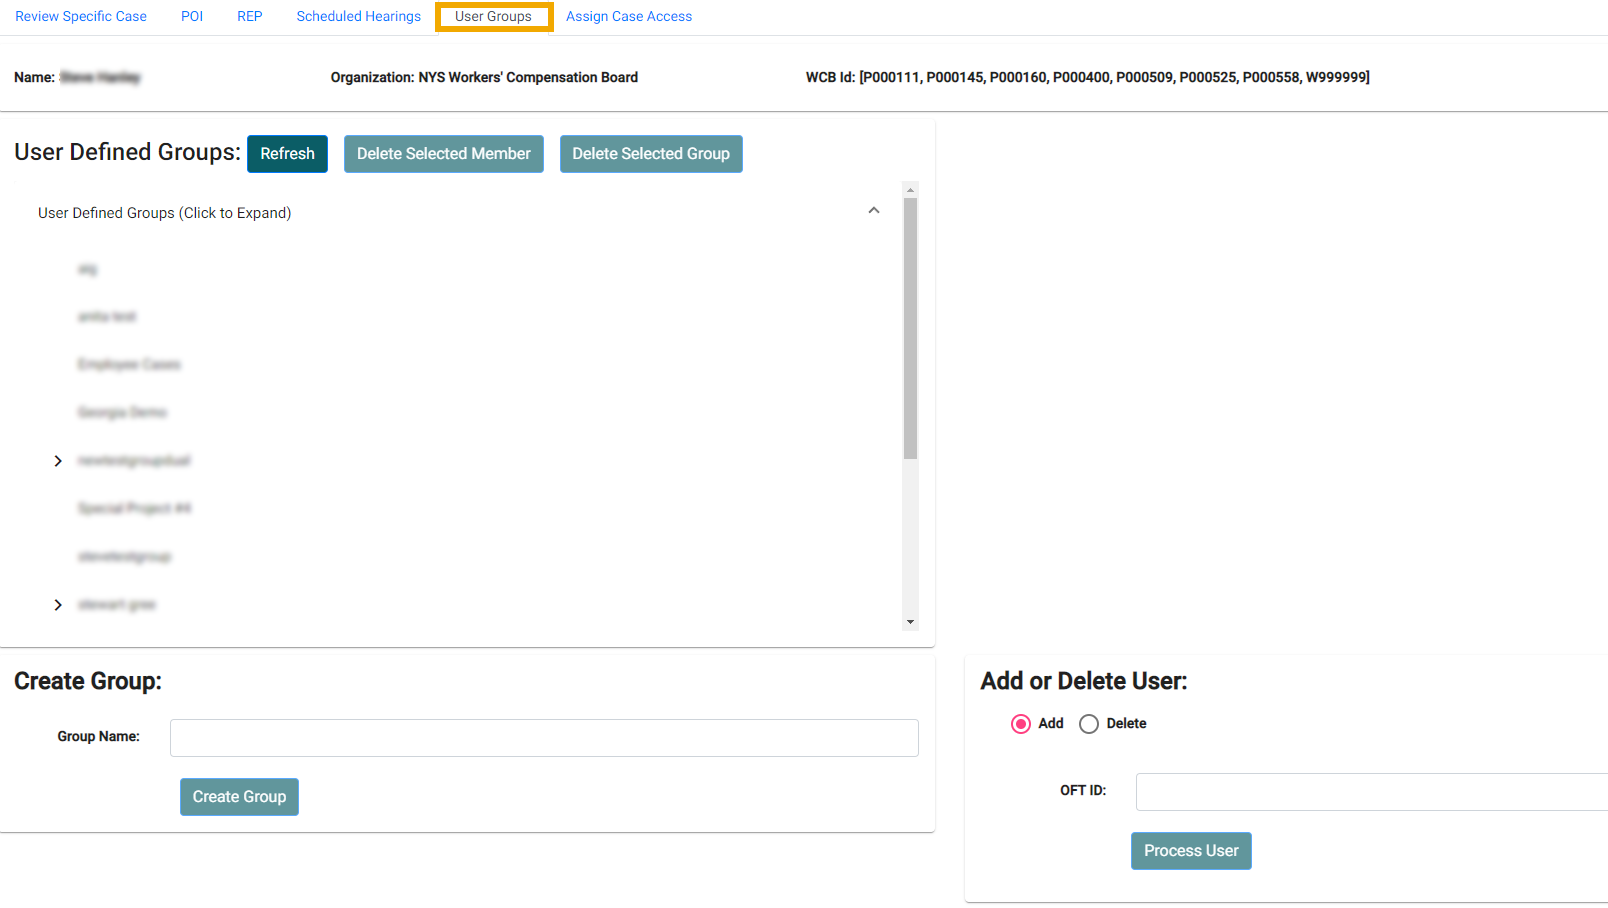
The User Groups tab will allow the eCase administrator to create and maintain custom User Defined Groups. This may be useful if you have specific teams of users and would like to assign access based on those teams.

Create a user defined group:
- Select User Groups menu tab
- Under Create Group, enter the new User Defined Group Name and select Create Group

- Select OK on the confirmation message.

To add users to the group:
- Select the user defined group to which you wish to add a user.
- Type the NY.gov ID (OFT ID) of the user you wish to add.

- Select Process User to add user to selected group.
- Select OK on the confirmation message and then select the Refresh button.

To delete users from the group:
- Select the user defined group to which you wish to delete a user from and select the arrow to expand the list and see all users within that user defined group.

- Select the user you wish to remove from the group and select Delete Selected Member button.

- Select OK on the confirmation message.

OR
- Select the user defined group to which you wish to delete a user from.
- Select Delete under Add or Delete User
- Enter the User ID of the user you wish to delete from the user defined group.
- Select the Process User button, you will and receive a confirmation message the user was removed.
To delete an entire group:
Note: To delete an entire user defined group you must:- Remove all current case access that has been granted
- Remove all individual users from within the user defined group.
- Select the group to which you wish to delete.

- Select the Delete Selected Group button. You will receive a confirmation message the group was deleted.
Assigning case access for user defined groups
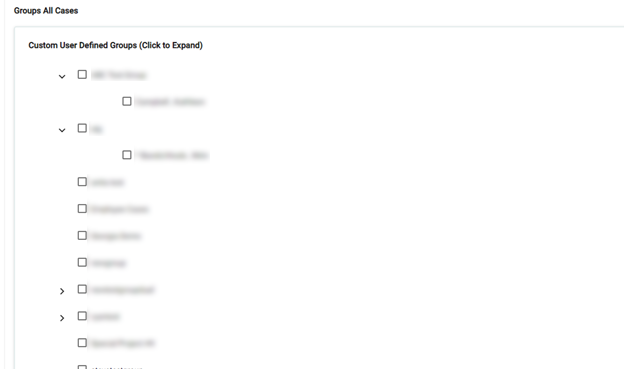
Granting and removing case access to custom User Defined Groups is done under the Assigning Case Access tab and is the same as the process for NYS/WCB Groups, however, you will select the User Defined Group option. If you have multiple groups, expand the list to see the list of custom groups.

Additional resources
Administrator Responsibilities