Treatment/Testing prior authorization requests (PARs) are replacing paper forms Attending Doctor's Request for Optional Prior Approval and Carrier's/Employer's Response (Form MG-1), Attending Doctor's Request for Approval of Variance and Carrier's Response (Form MG-2) and Attending Doctor's Request for Authorization and Carrier's Response (Form C-4AUTH). These forms can no longer be used to request authorization for treatment or testing. Health care providers will not need to know what type of PAR to submit, instead they will answer questions based on the treatment/testing needed and the type of PAR will be determined based upon the information they provide. Treatment/Testing PARs submitted through OnBoard will automatically be routed to the appropriate claim administrator for review.
Treatment/Testing PAR - Level 1 Review
Note: This example will use a MTG Special Services PAR. Other PAR categories or specific responses within MTG Special Services will have different questions and/or form fields. The process for each is the same with varying information needed.
On the dashboard, the Prior Auth > My PARs tab will update with new PARs that have been assigned to a Level 1 reviewer. The PAR Status column indicates the level of review needed. The Due Date column is the date the payer is required to respond. If the payer does not respond within the designated time frame, an Order of the Chair may be issued.
Responding to request
To respond to a request, select the PAR ID link to open the PAR Details page.

Review all sections of the PAR details, including the Request Details, and Documents uploaded by the health care provider.
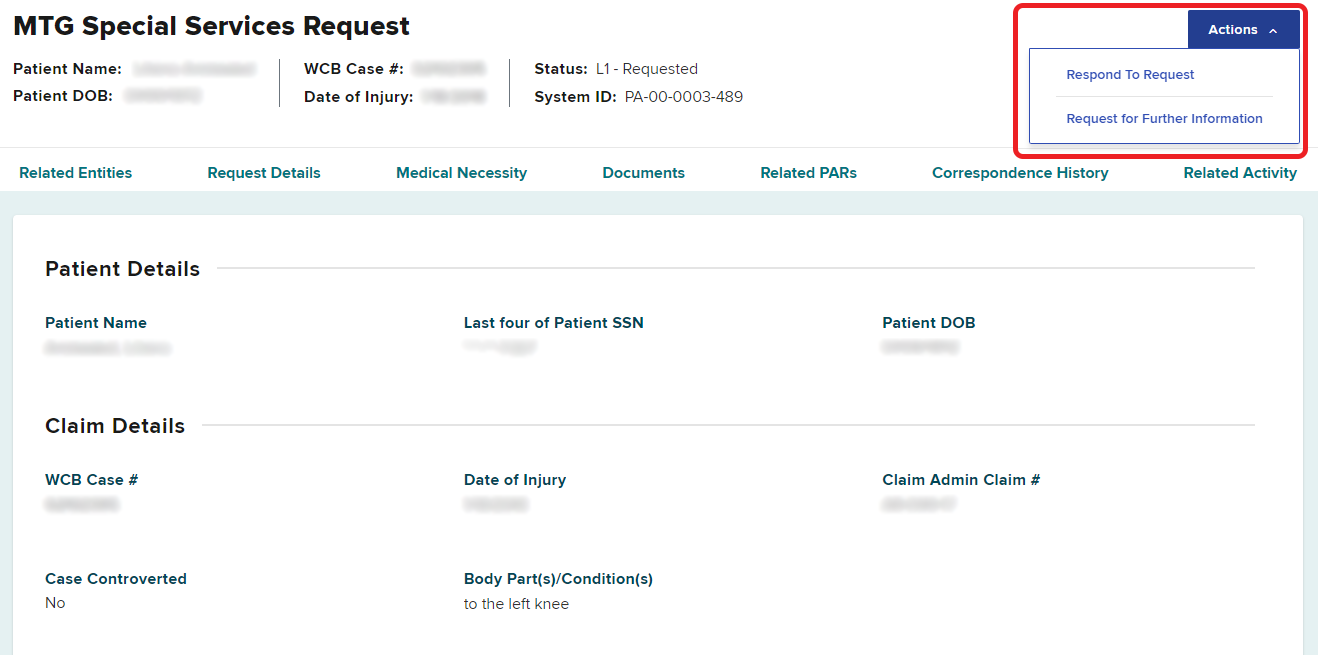
Select the Actions button on the top right of the PAR Details page to respond to the request or request additional information from the provider.
Request for Further Information (RFI)
If more information is needed from the provider in order to respond to the PAR, select Request for Further Information. The due date for the reviewer to respond to a PAR is not extended when there is a request for more information made or if the request for more information never receives a response.
Learn how to send a Request for Further Information, and view the response from the provider.
Independent medical exam (IME)
If an IME needs to be conducted before responding to an MTG Variance or MTG Special Services PAR, a notification should be sent using OnBoard to the requesting health care provider within five days of the PAR's submission date. When the IME Requested Notification is timely sent to the provider, the timeframe for response will automatically be extended from 15 days to 30 days.
Learn how to send an Independent Medical Exam Request Notification.
Level 1 Insurer Response
To issue a determination on the submitted PAR, select the Actions button at the top right of the PAR Details page and select Respond to Request.
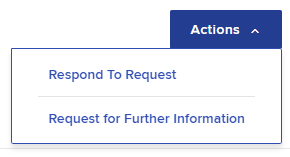
A Level 1 reviewer can grant the request, grant part of the request, or deny the request. Select the option you would like to take on the PAR to see the steps to respond.
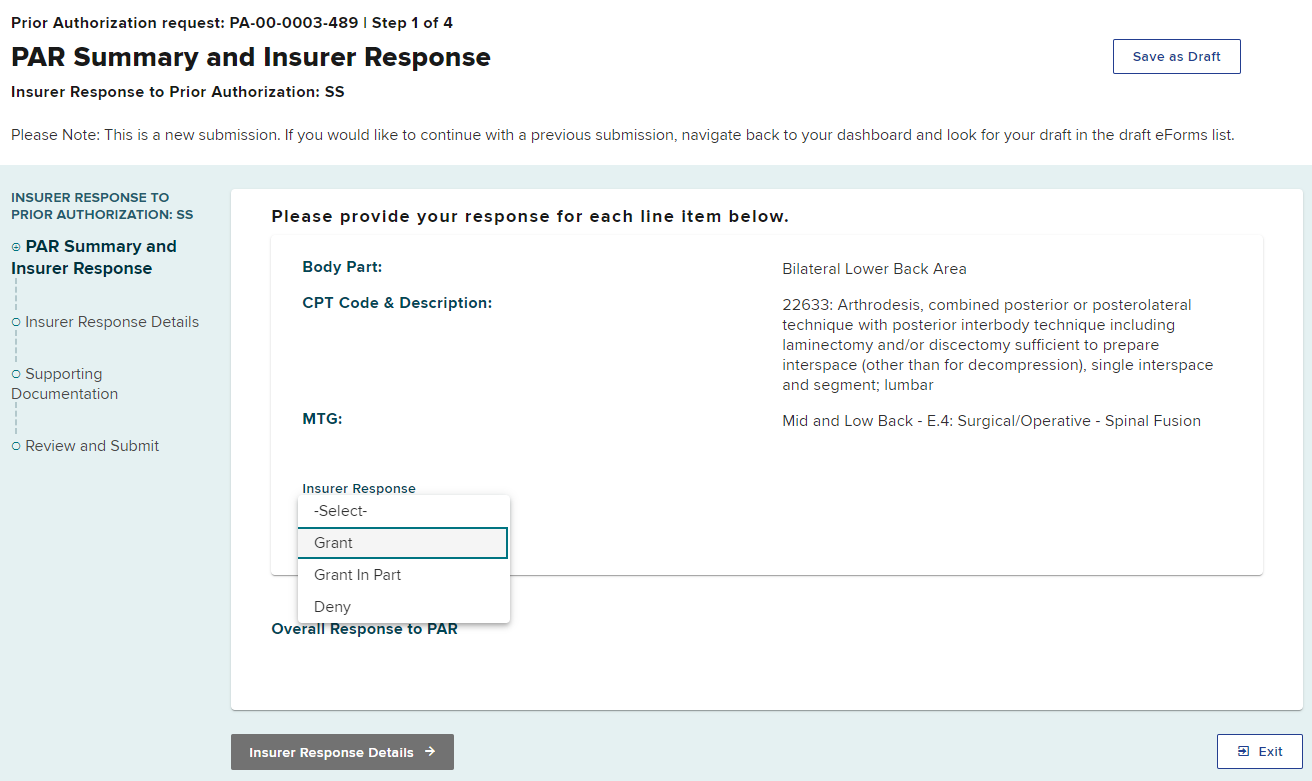
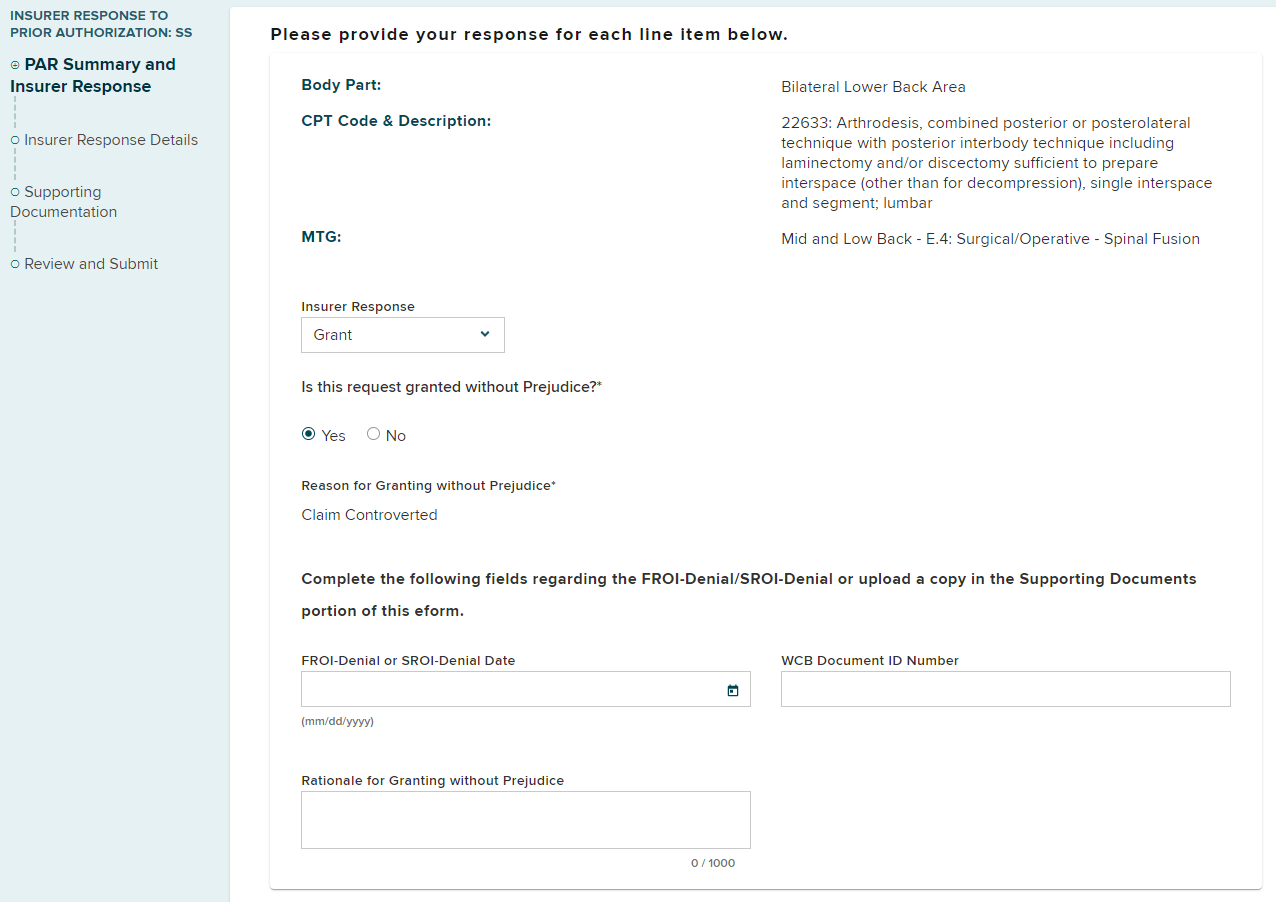
On the PAR response eForm, select the Insurer Response drop-down list and select Grant.
Granted Without Prejudice
The question Is this request granted without Prejudice? defaults to No.
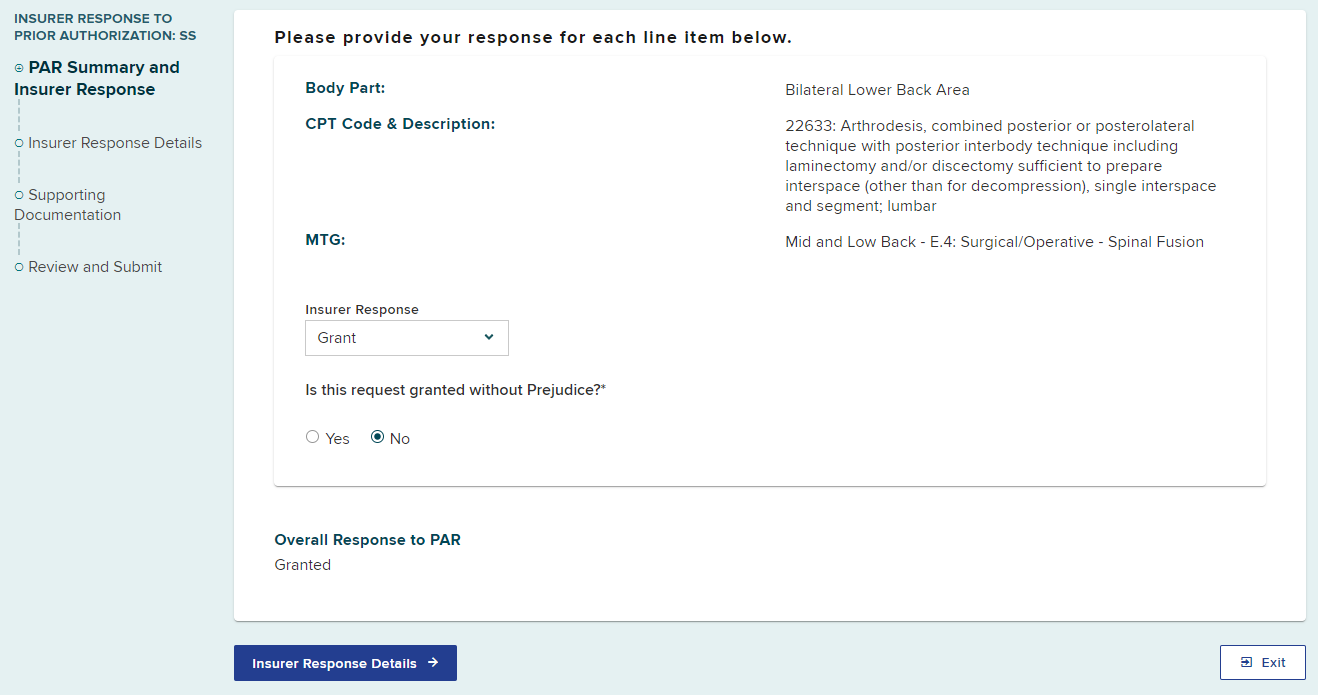
A "grant without prejudice" can be Yes for a Level 1 review if a denial (First Report of Injury [FROI-04] or Subsequent Report of Injury [SROI-04]) has been filed in the case and the controversy is still pending.
You will need to complete the additional fields regarding the FROI-Denial/SROI-Denial.
- You can find the FROI-Denial/SROI-Denial date and WCB Document ID number in eCase.
- If the documents are not available in eCase, upload a copy in the supporting documentation portion of the eForm.
You may enter additional rationale for granting without prejudice due to the claim being controverted in the text field.
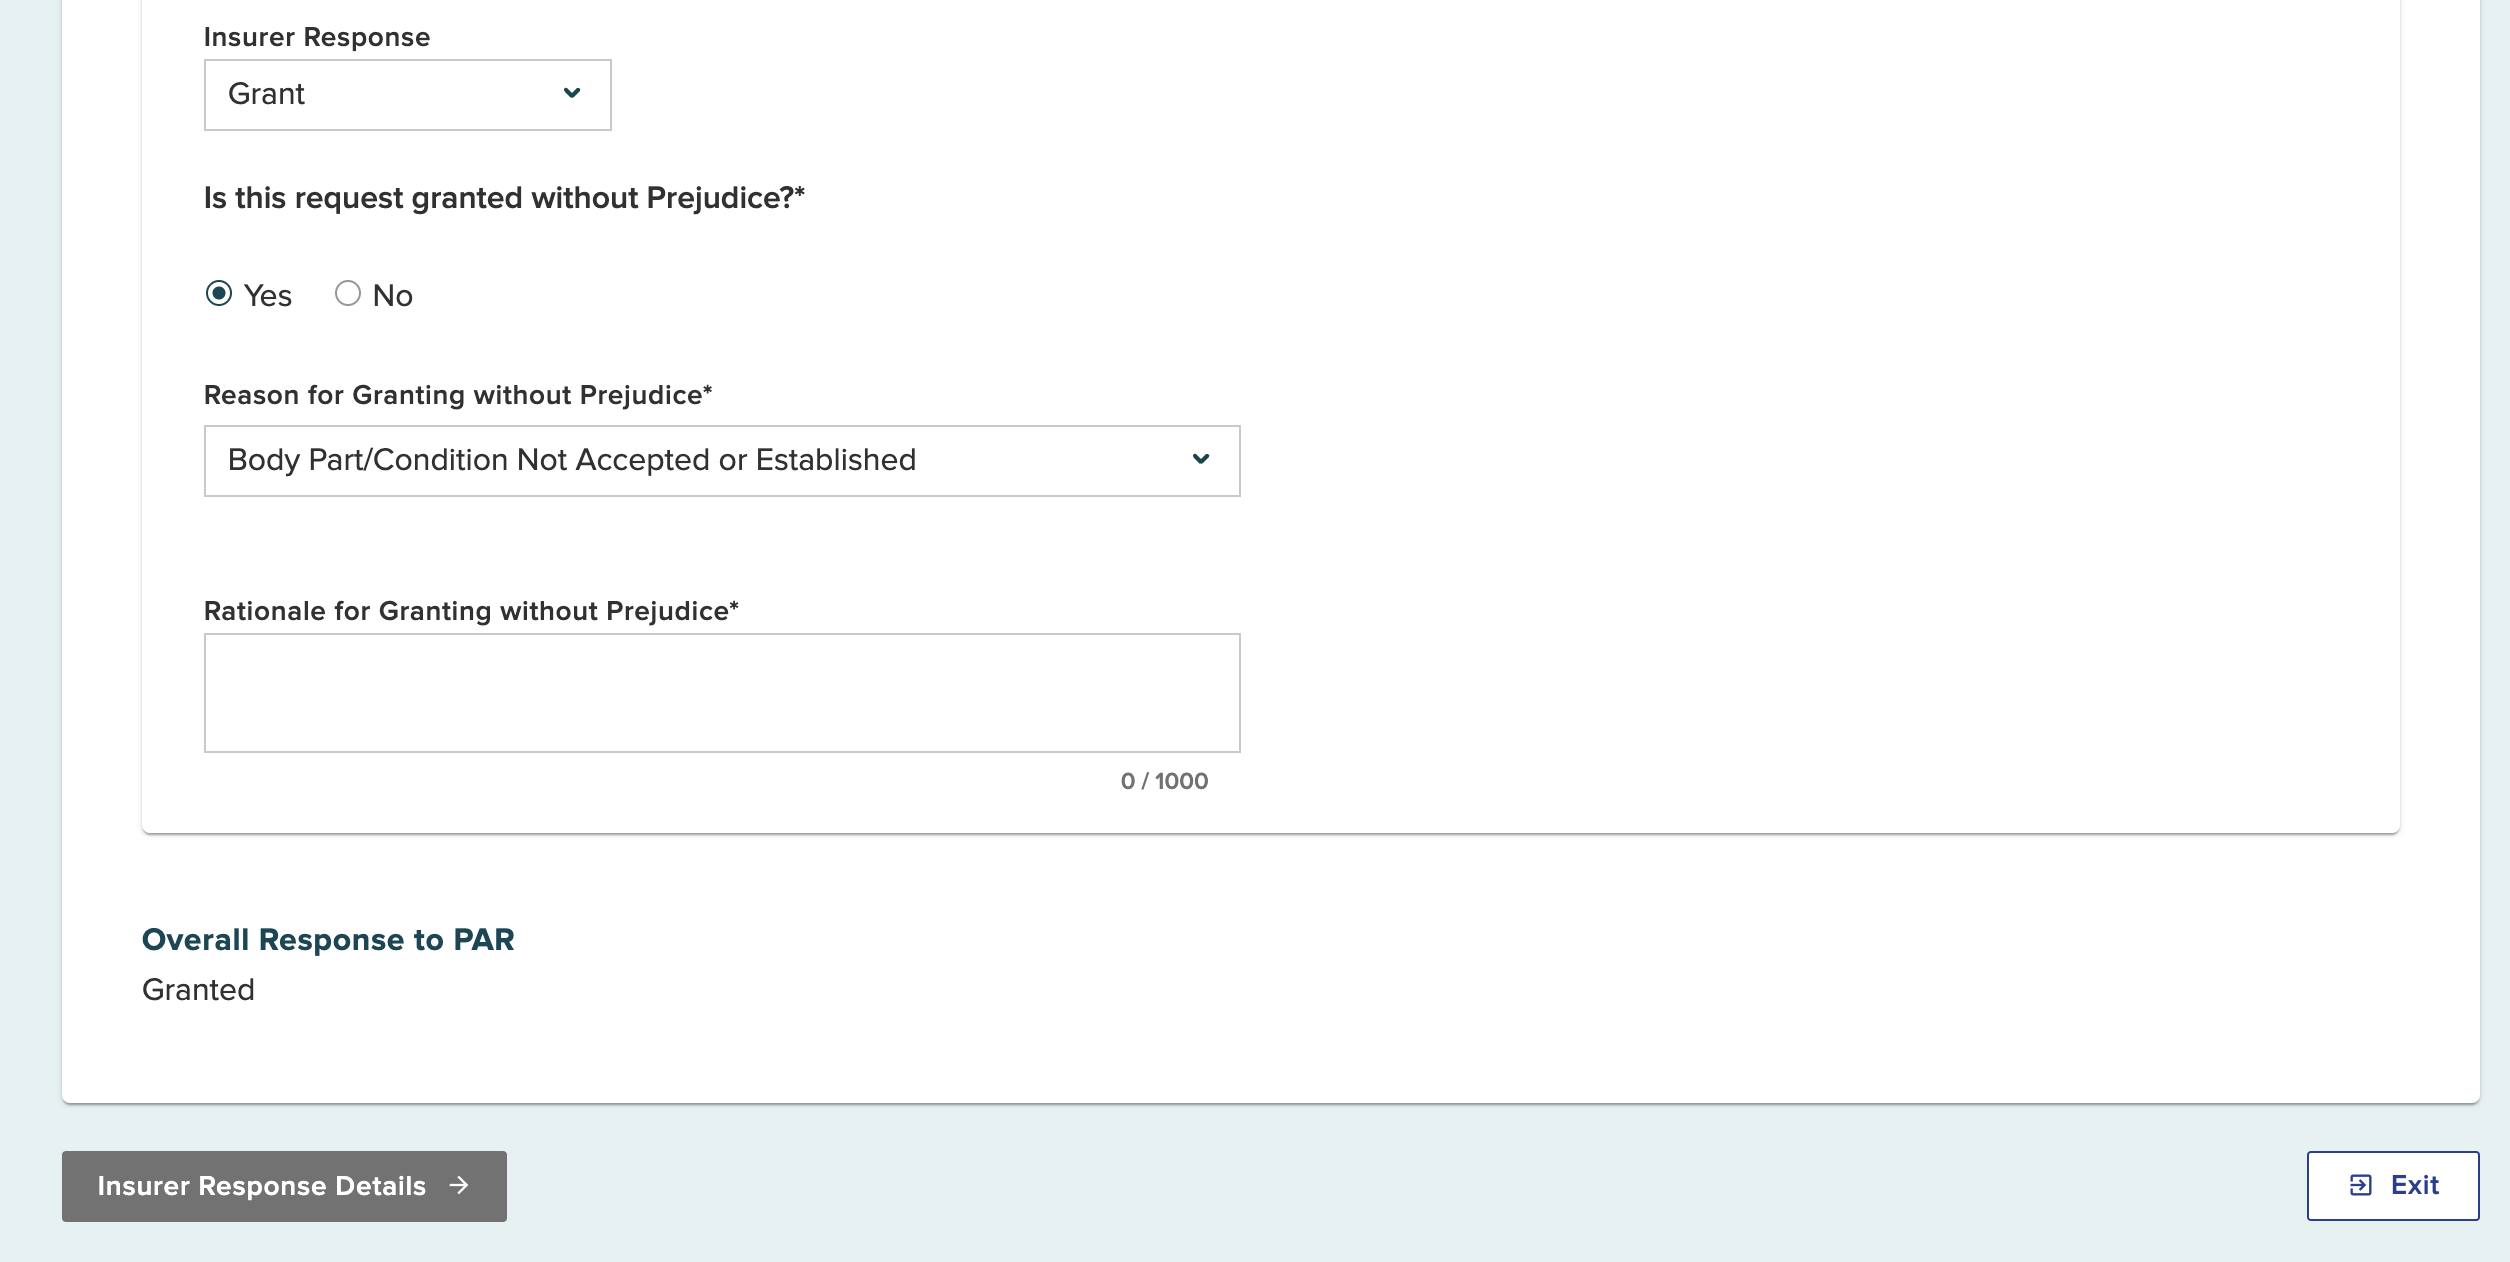
A "grant without prejudice" can be a Yes for Level 1 review if a body part/condition has not been accepted or established.
You are request to enter rationale in the text field for granting without prejudice due to a body part/condition having not been accepted or established.
Select the Insurer Response Details button.
Claim apportioned
The question Is this claim apportioned? defaults to No.
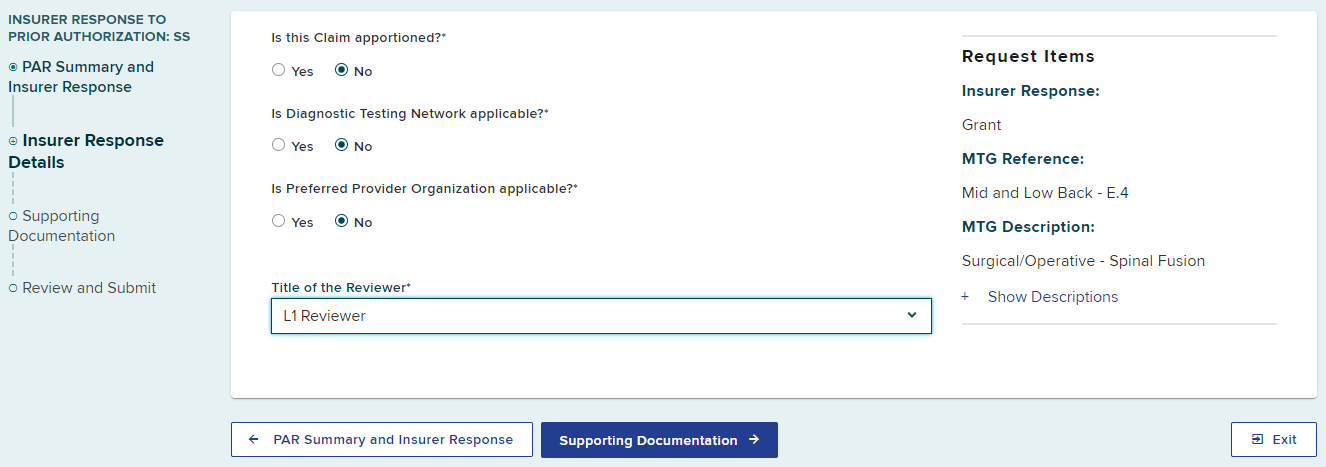
If the claim is apportioned, select Yes and answer the additional required fields. The claim apportionment information included as the PAR response from one payer applies to all, and the apportionment fields allow the insurer to inform the provider of how to bill properly.
Respond to questions regarding Diagnostic Testing Network (DTN) and Preferred Provider Organization (PPO)
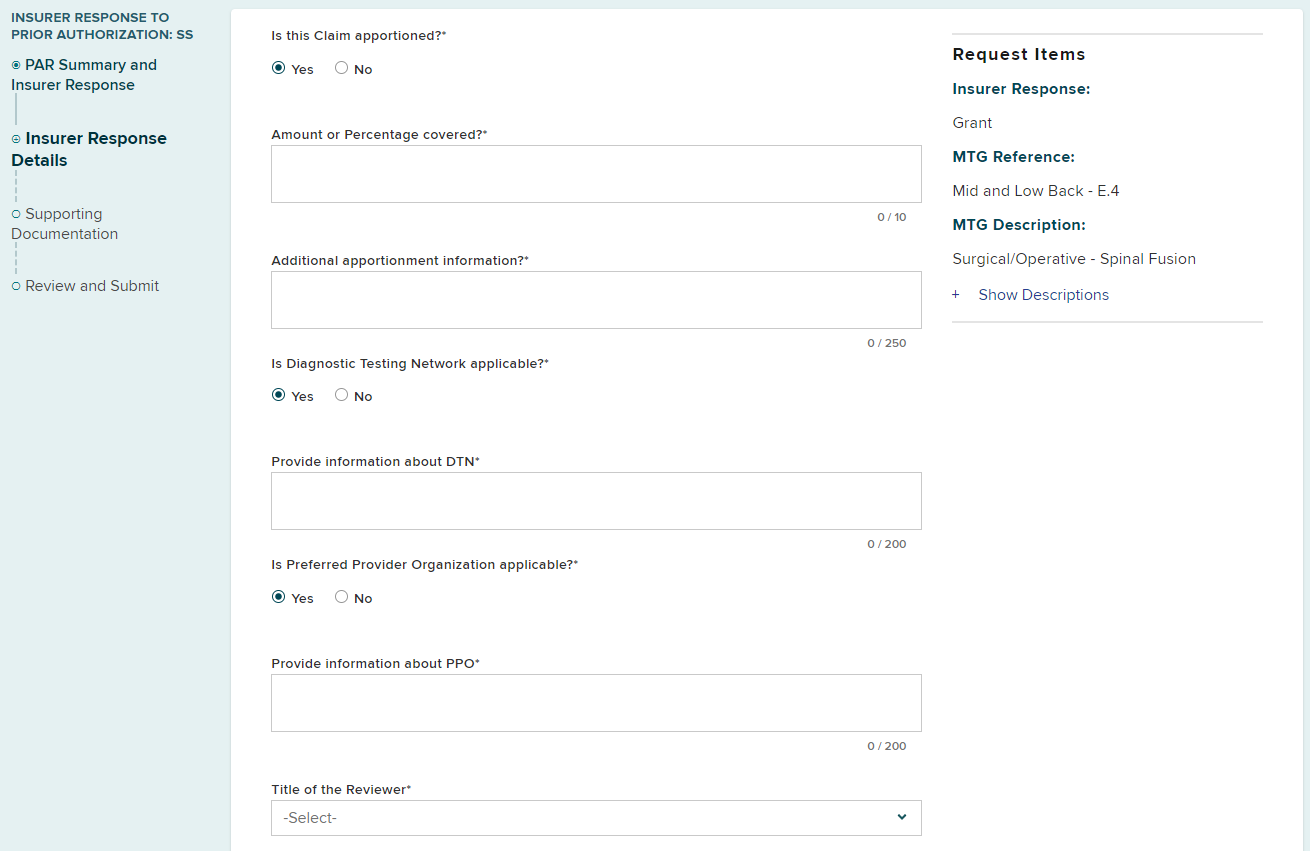
Select your title from the Title of the Reviewer drop-down list. If the appropriate title cannot be found, select Other and enter the appropriate title.
Select supporting documentation.
Uploading supporting documentation
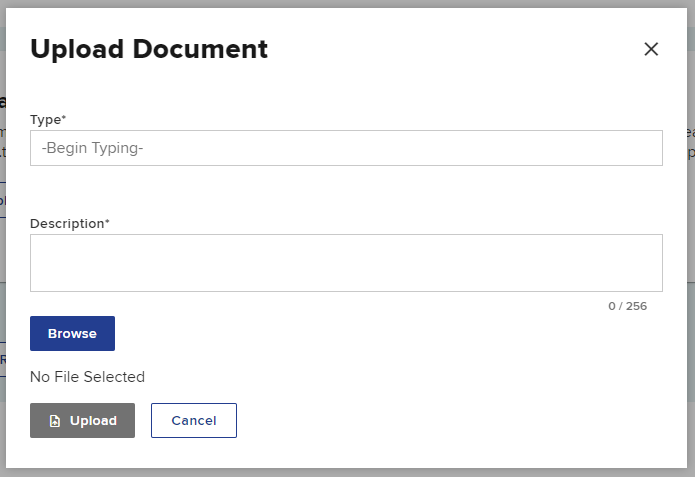
Select Upload to add supporting documentation to the PAR response.

- Enter the type of document from the Type drop-down list.
- Enter a Description of the document being added.
- Select the Browse button to locate the file on your computer.
- Confirm the file is the correct file you want to upload.
- Select Upload.
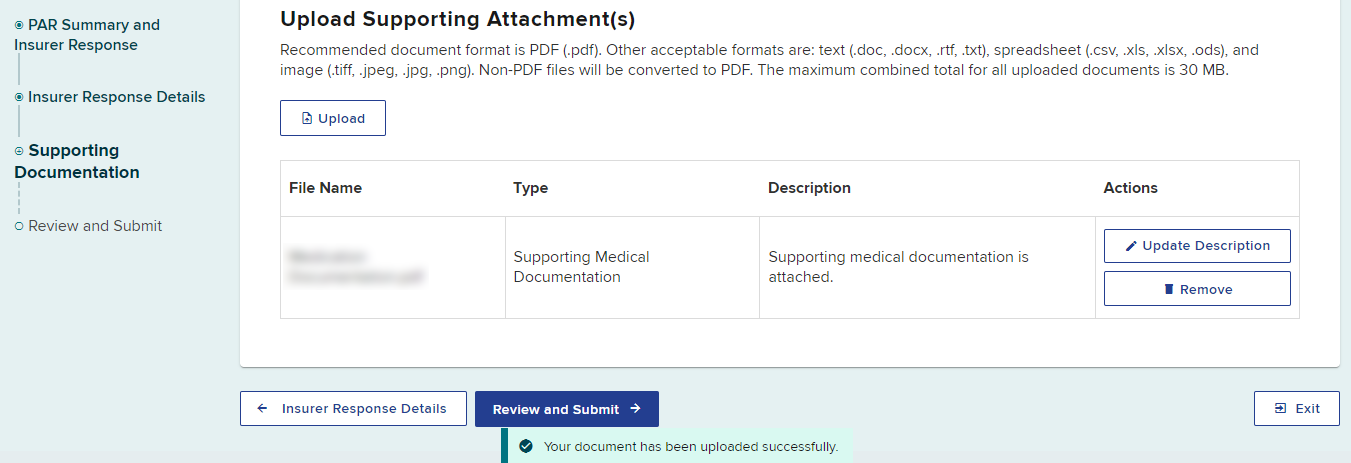
The attachment has now been added to the PAR response.
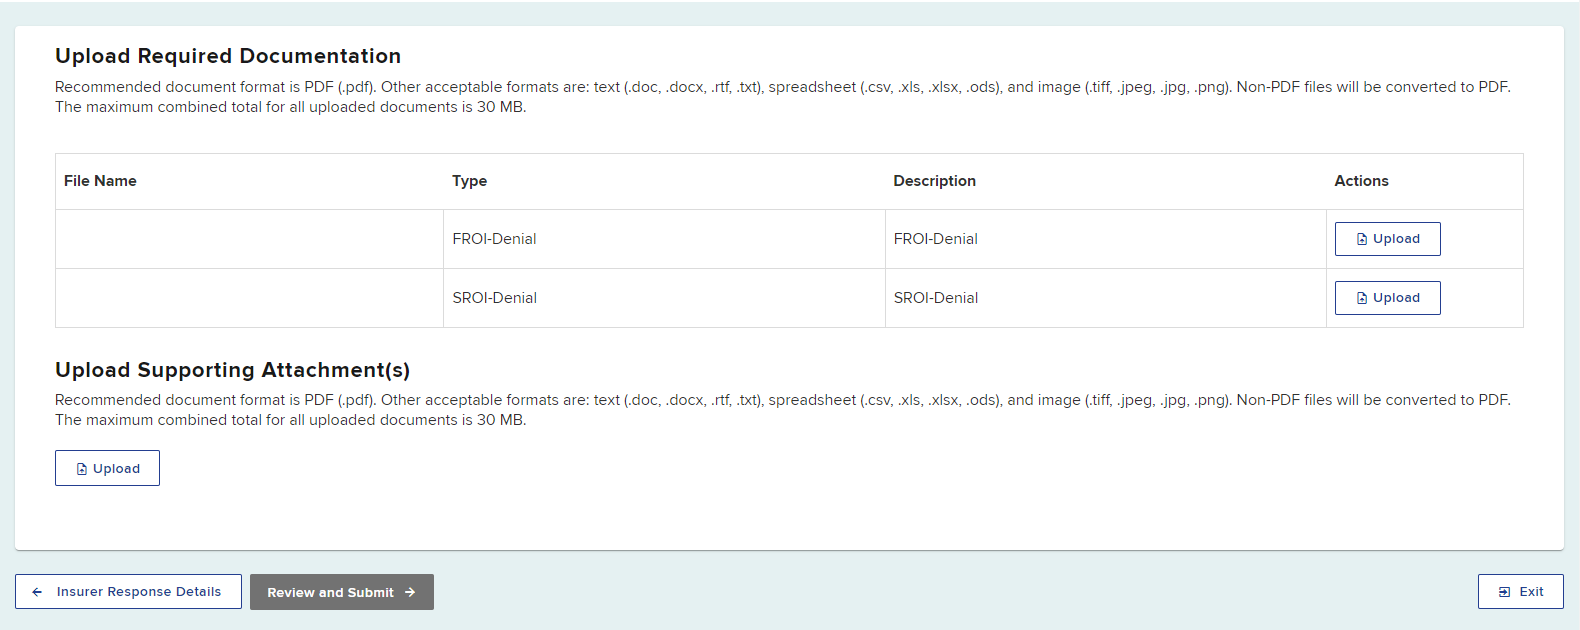
If you selected Yes to Granted Without Prejudice and did not complete the fields regarding the FROI-Denial/SROI-Denial, you will be prompted to upload the corresponding required FROI-Denial and/or SROI-Denial forms.
Select Review and Submit.
Submit Response
Review all of the PAR response details and select Submit.
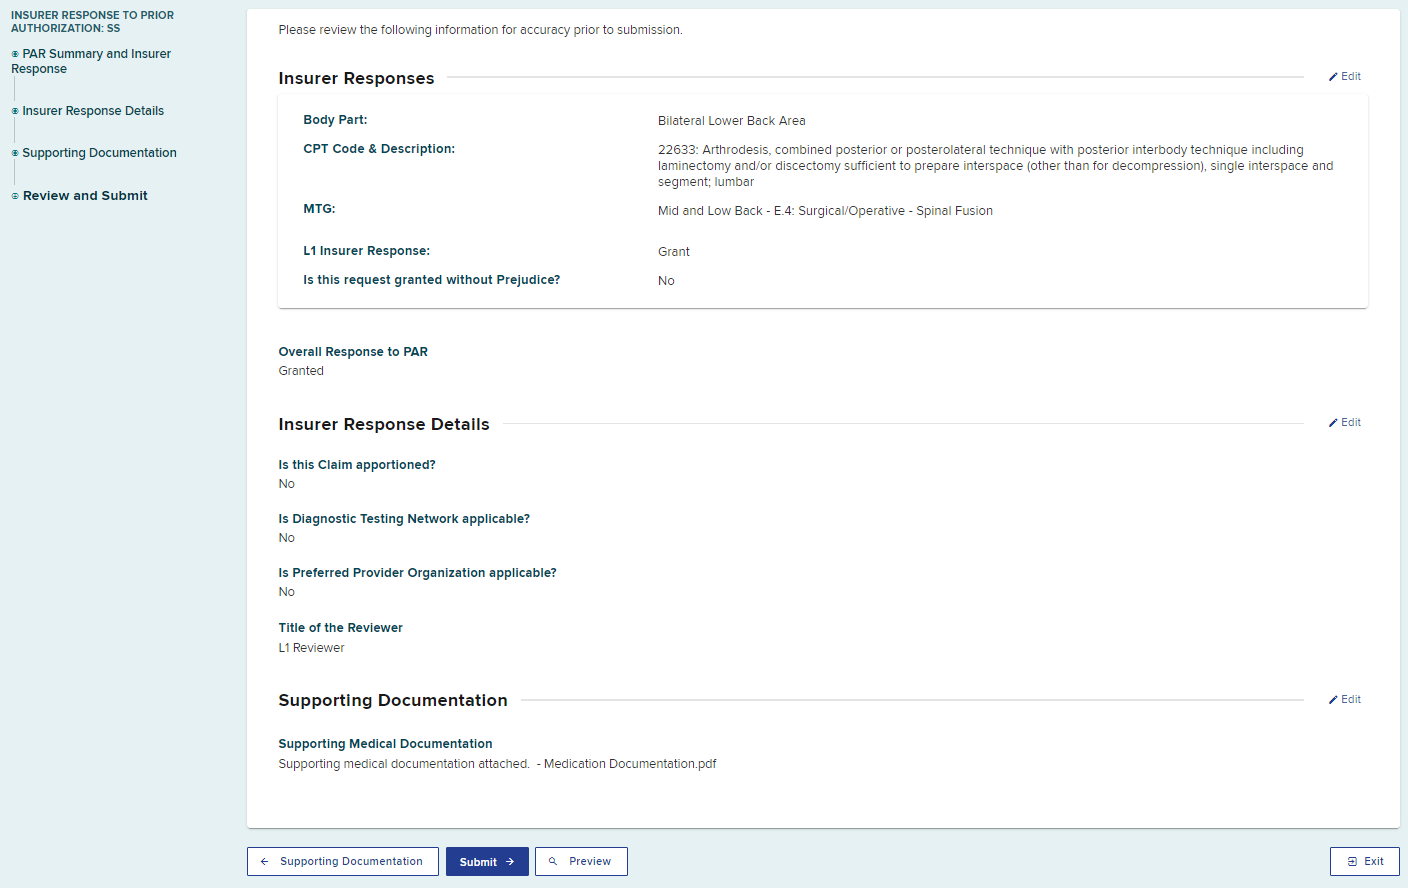
After the submission, a confirmation page will show the PAR as granted. You can print, download or view the complete eForm.
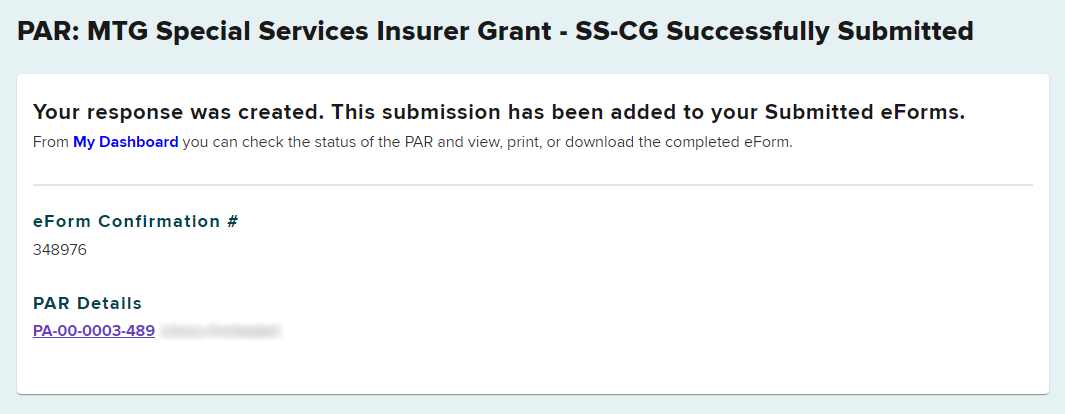
The PAR row will no longer appear on the My PARs tab.
The PAR response will show on the Submitted eForms tab.

It will also appear in the Prior Auth > Resolved tab.

Select Grant in Part from the Insurer Response drop-down list.
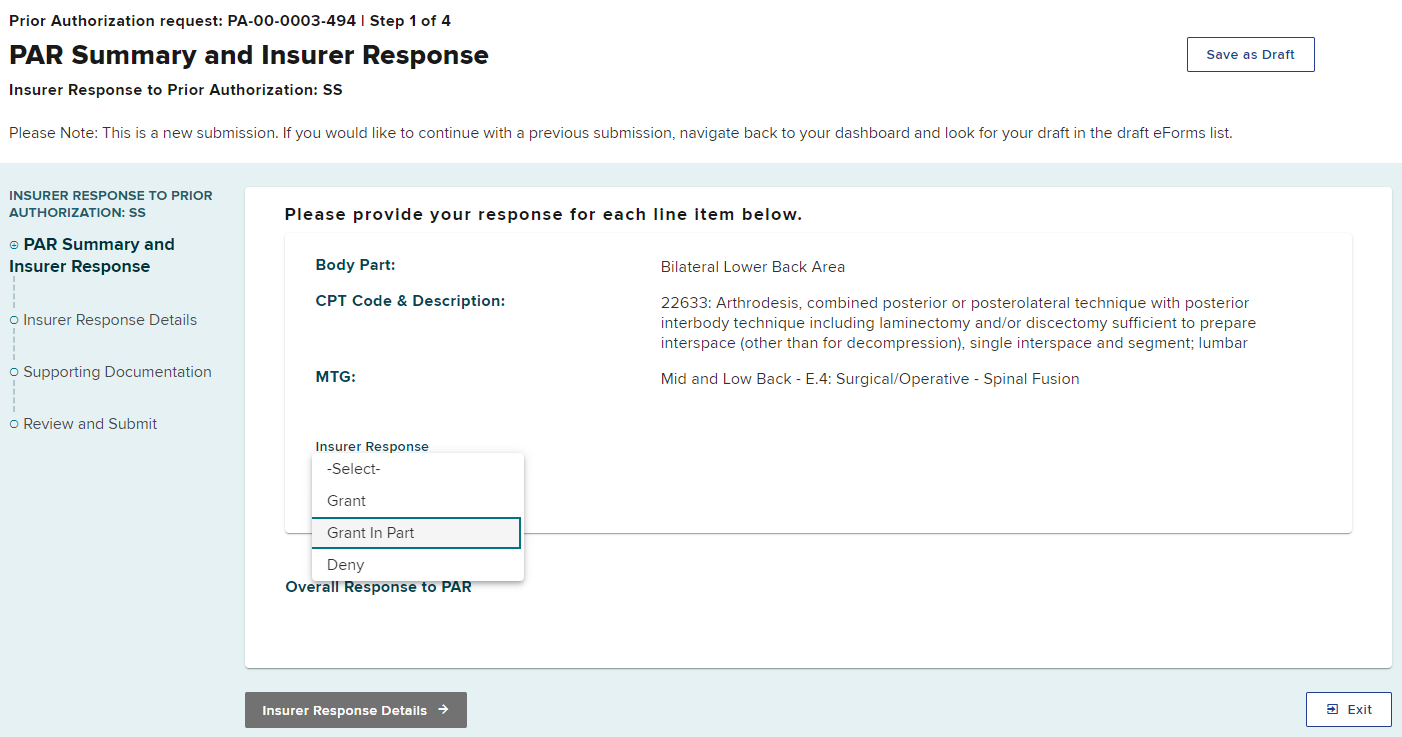
Granted Without Prejudice
The question Is this request granted without Prejudice? defaults to No.
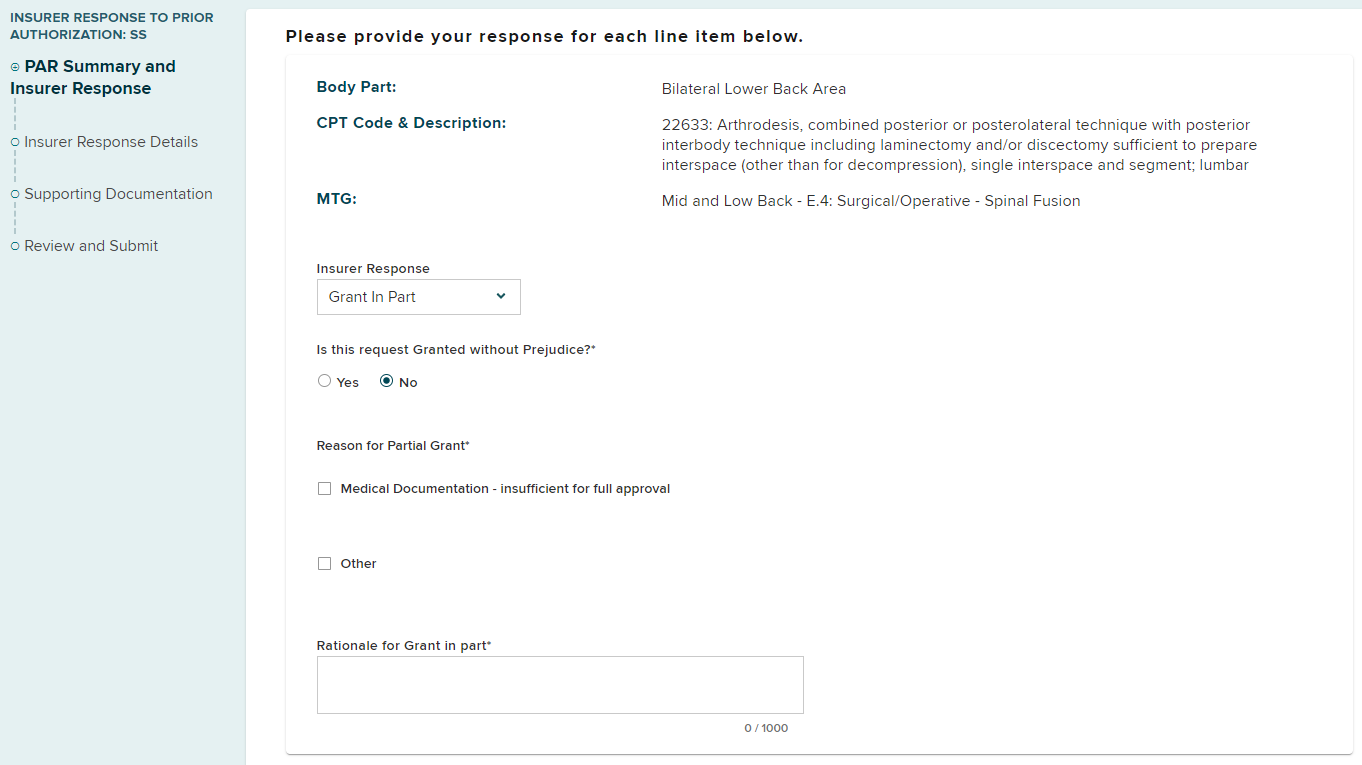
A "grant without prejudice" can be Yes for a Level 1 review if a denial (First Report of Injury [FROI-04] or Subsequent Report of Injury [SROI-04]) has been filed in the case and the controversy is still pending.
You will need to complete the additional fields regarding the FROI-Denial/SROI-Denial.
- You can find the FROI-Denial/SROI-Denial date and WCB Document ID number in eCase.
- If the documents are not available in eCase, upload a copy in the supporting documentation portion of the eForm.
You may enter additional rationale for granting without prejudice due to the claim being controverted in the text field.
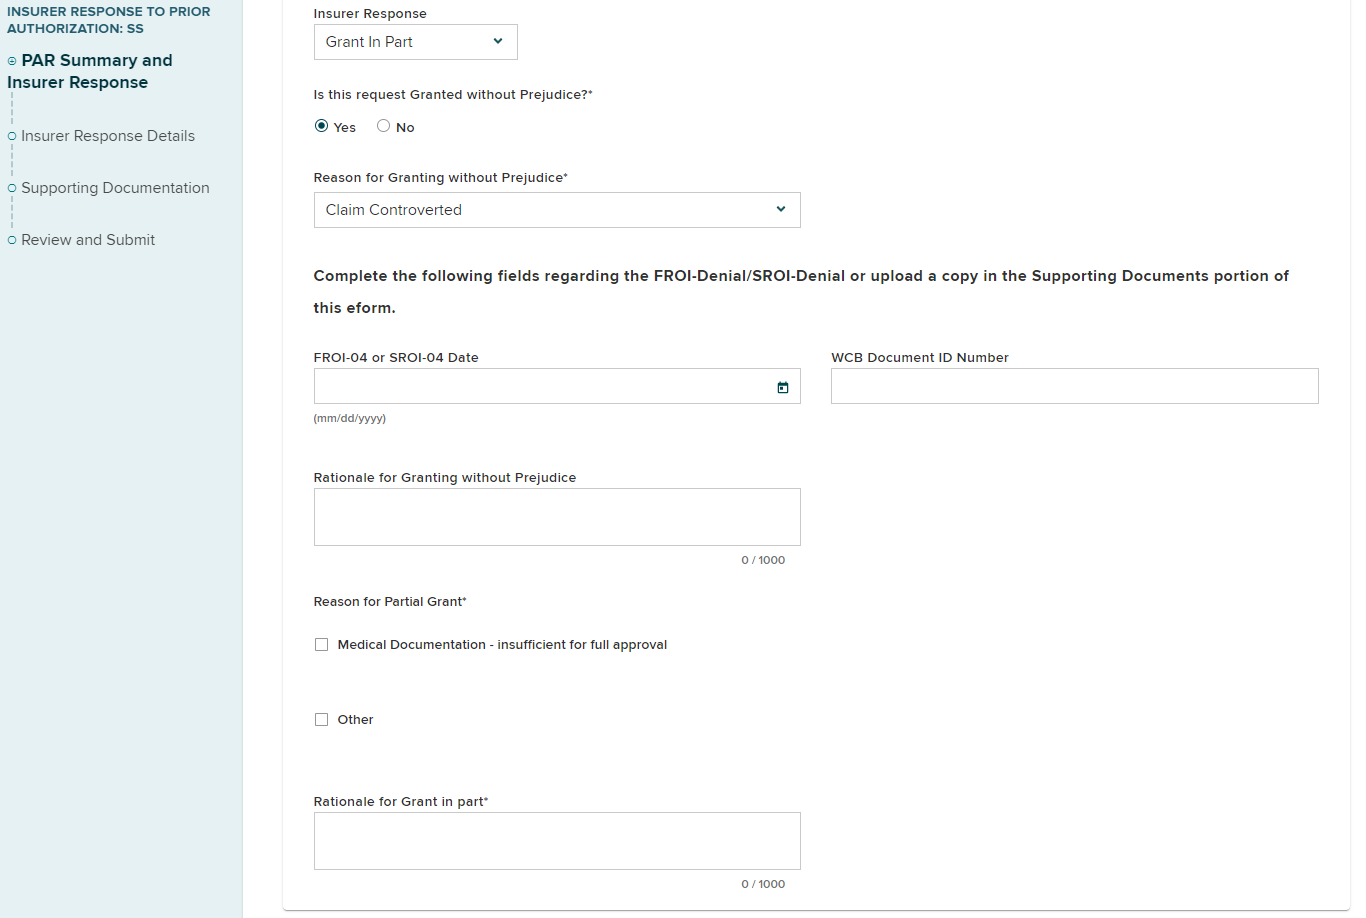
A "grant without prejudice" can be a Yes for Level 1 review if a body part/condition has not been accepted or established.
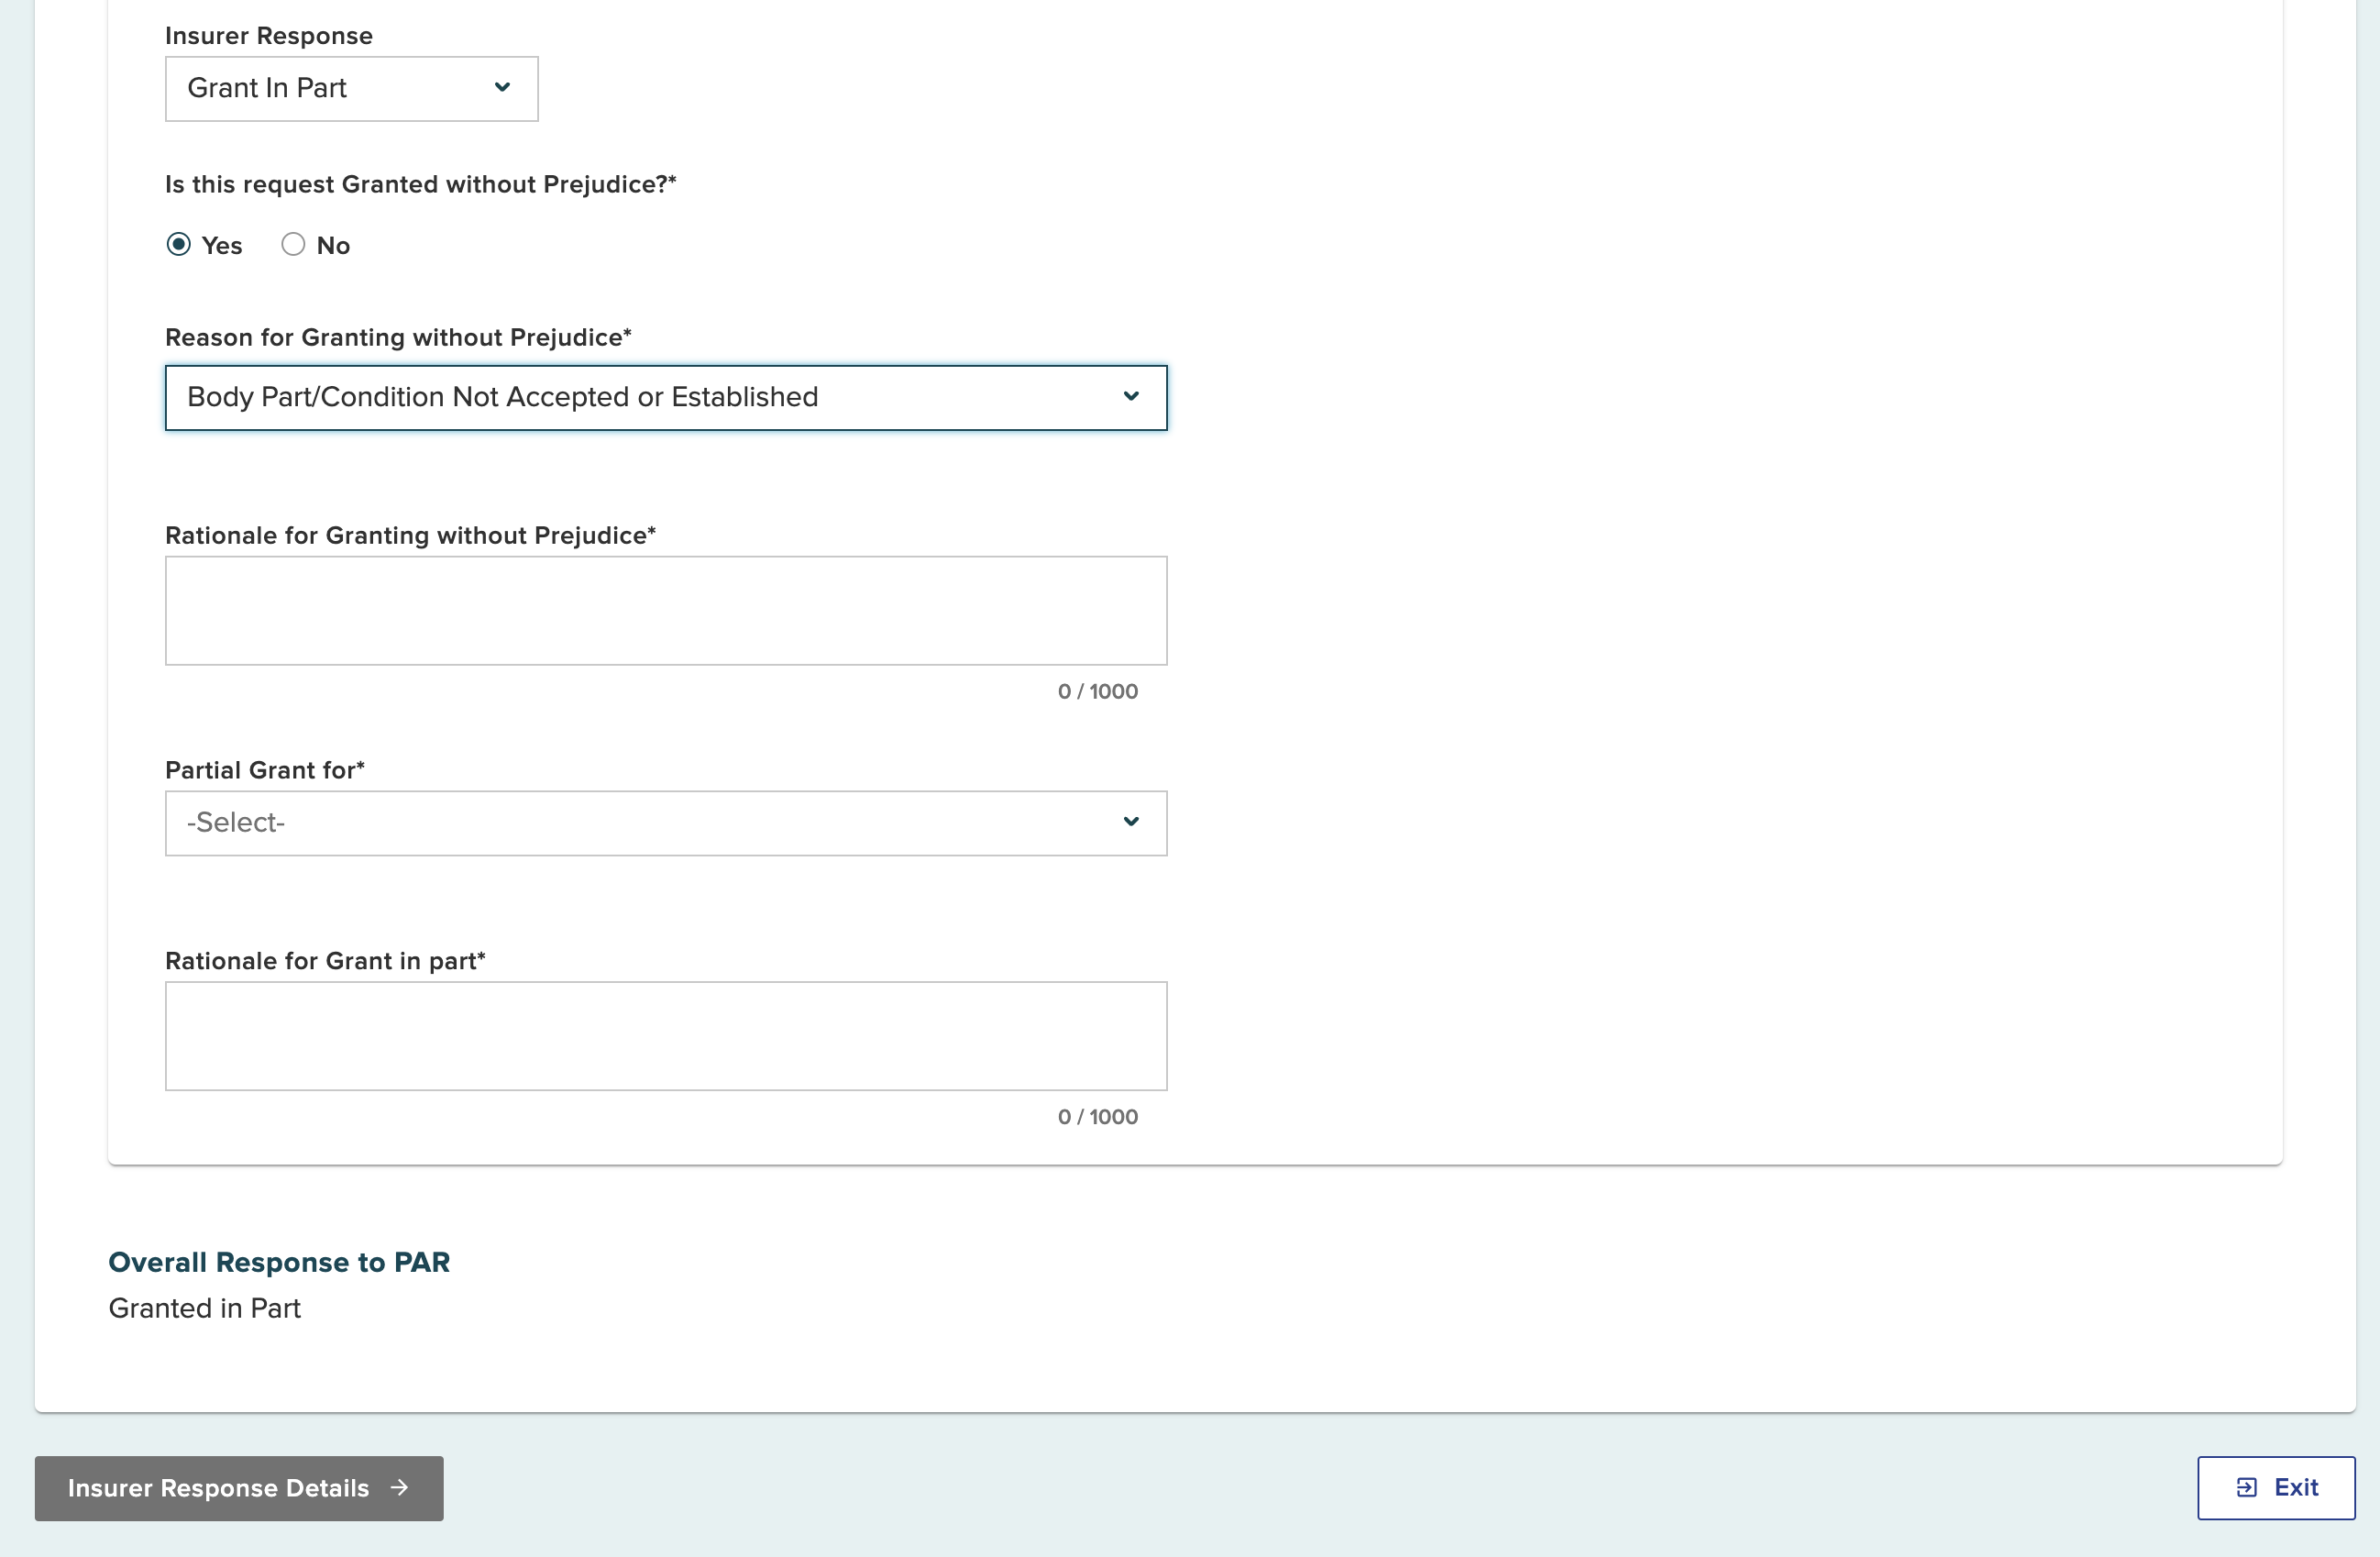
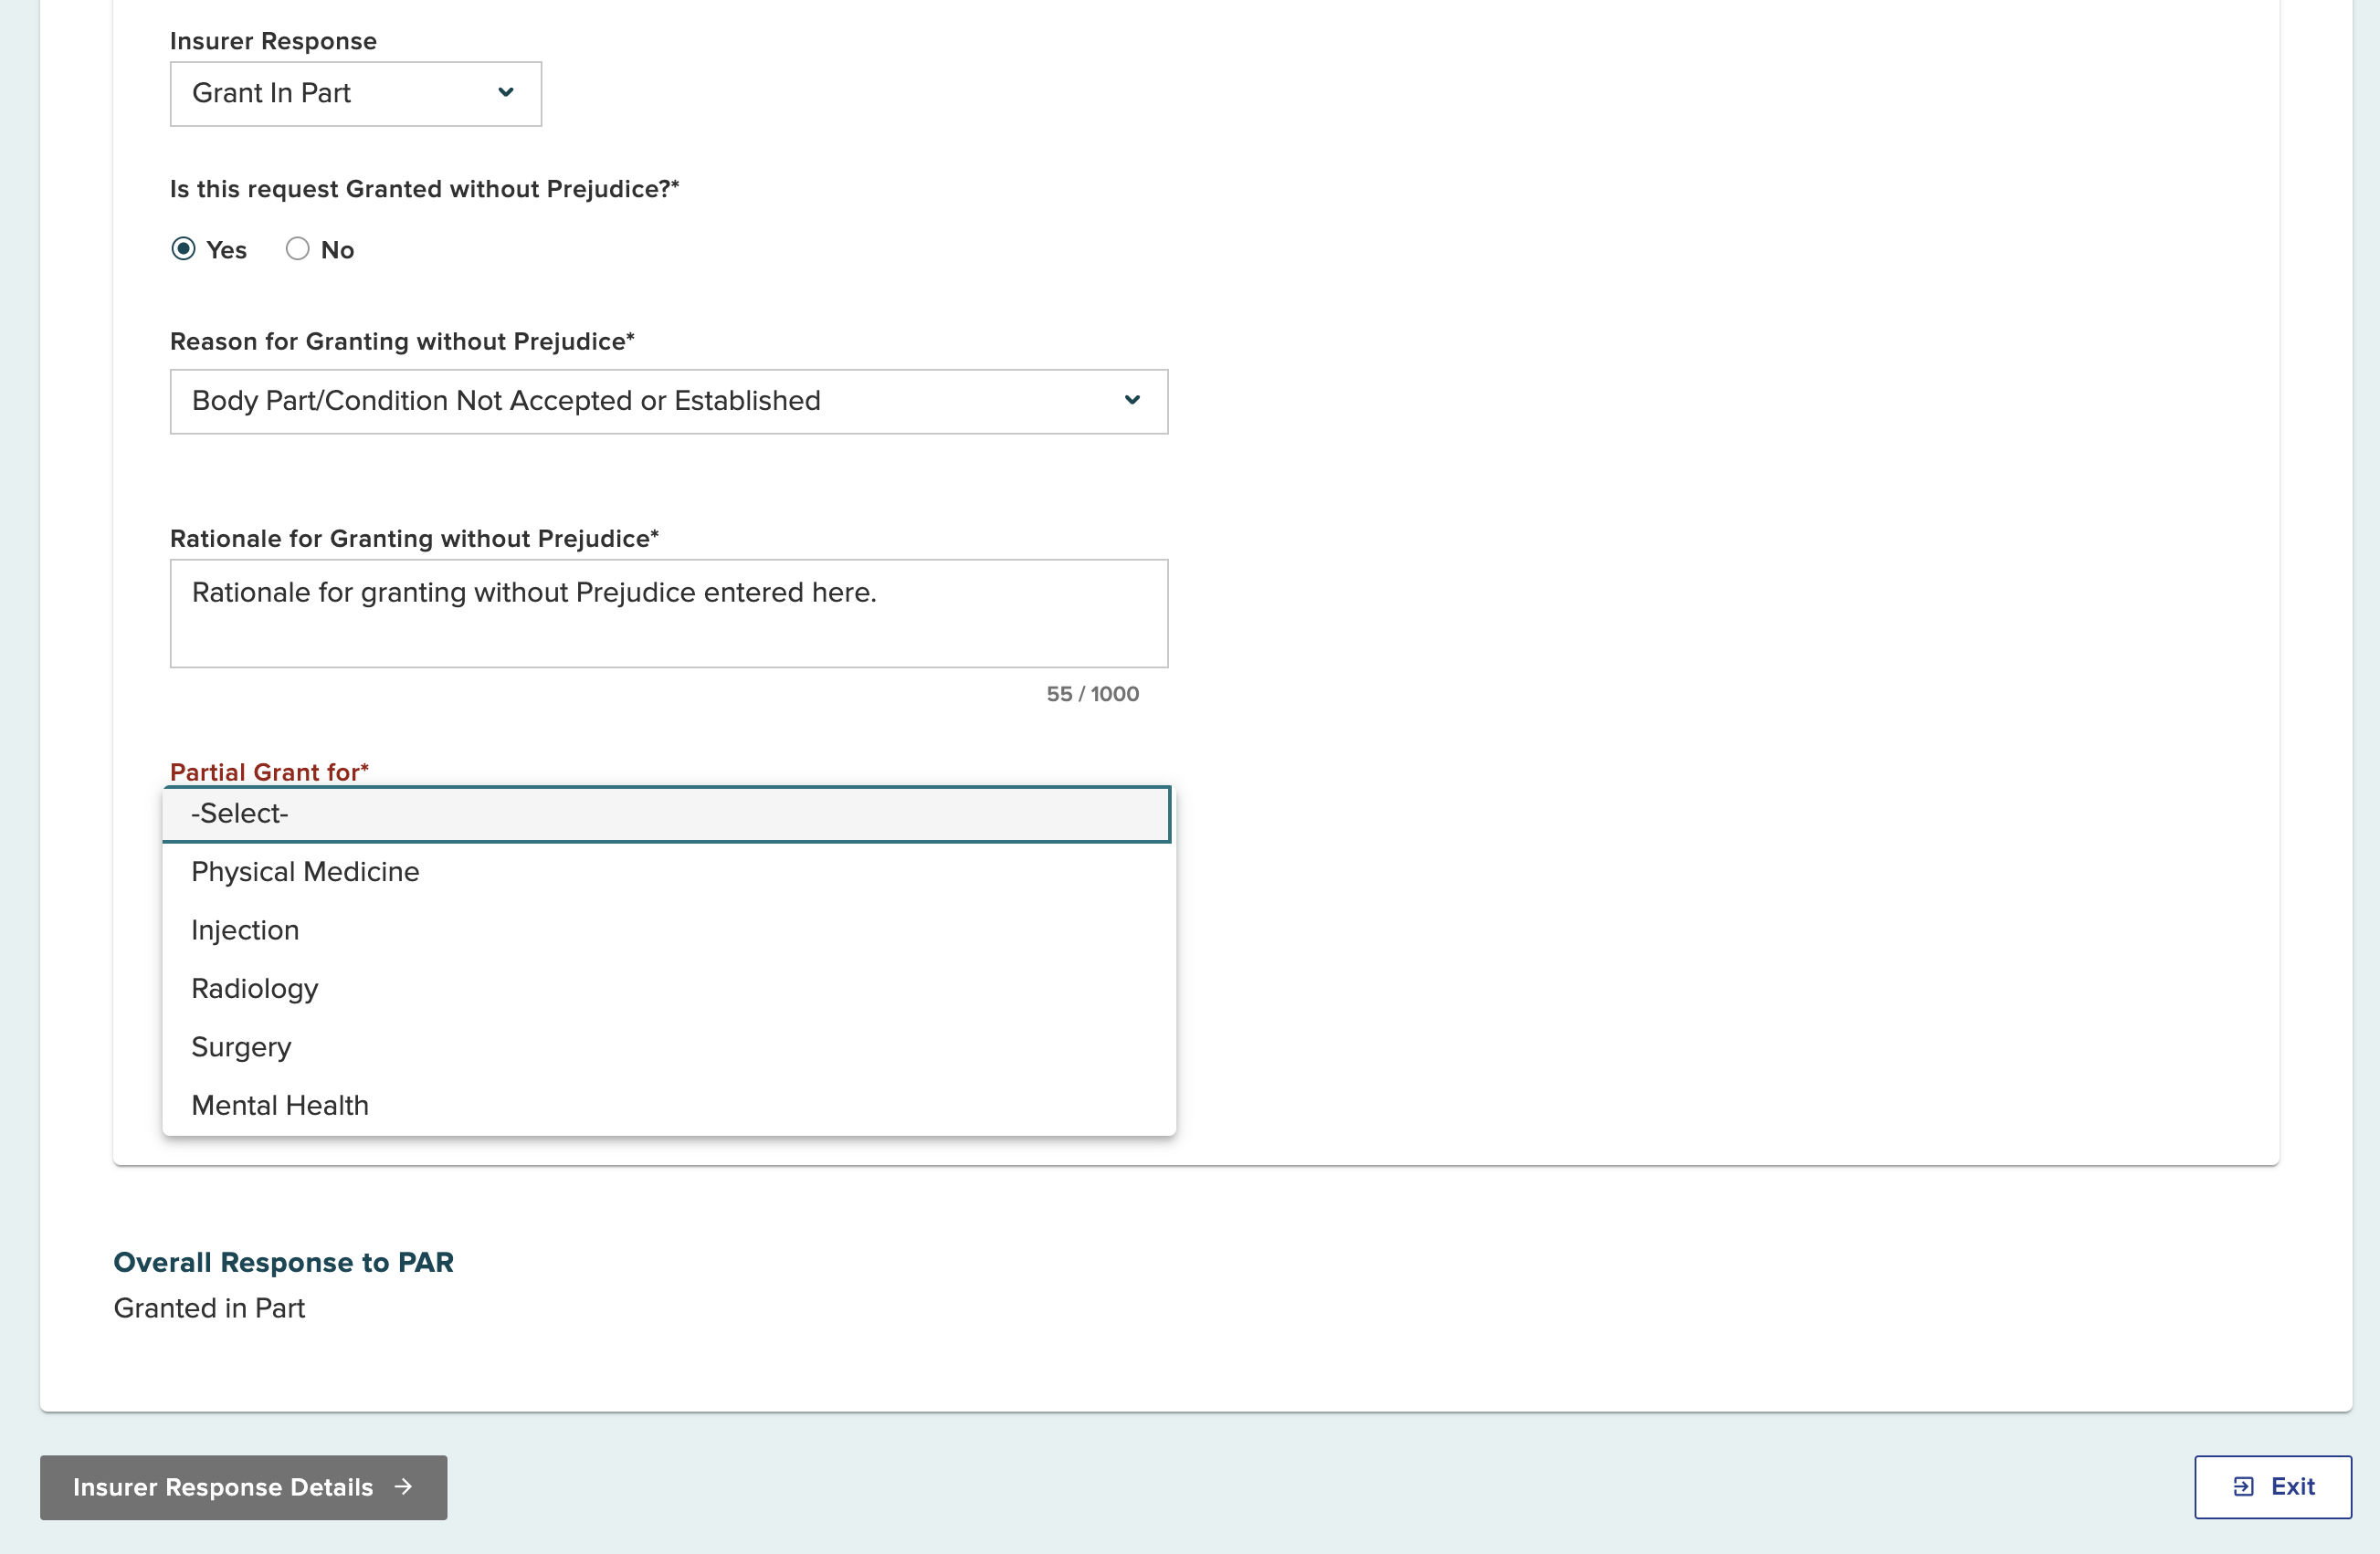
Continue entering required information regarding why the request is being granted in part. You will need to select what the partial grant is for from the Partial Grant for dropdown. Following your selection of what the partial grant is for, the next text field will display specific information required.
You will need to select what the partial grant is for from the Partial Grant for dropdown. Following your selection of what the partial grant is for, the next text field will display specific information required.
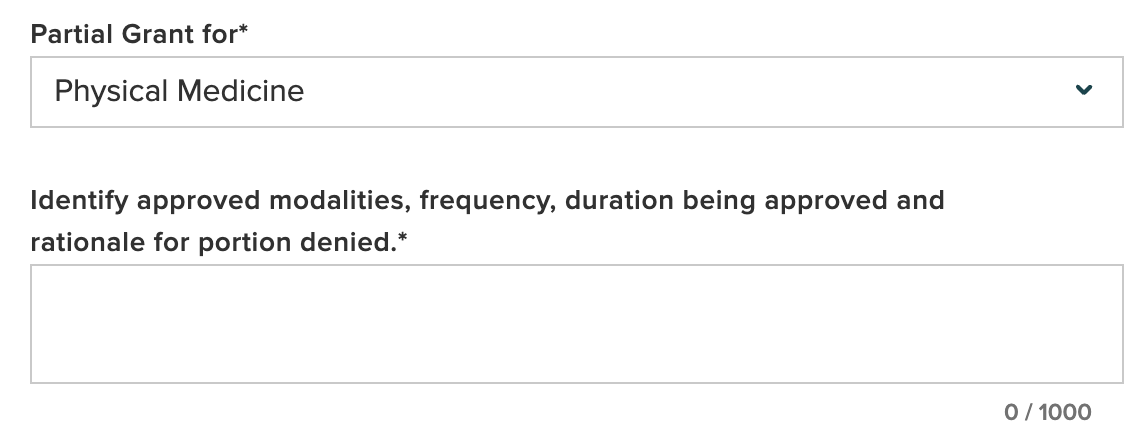
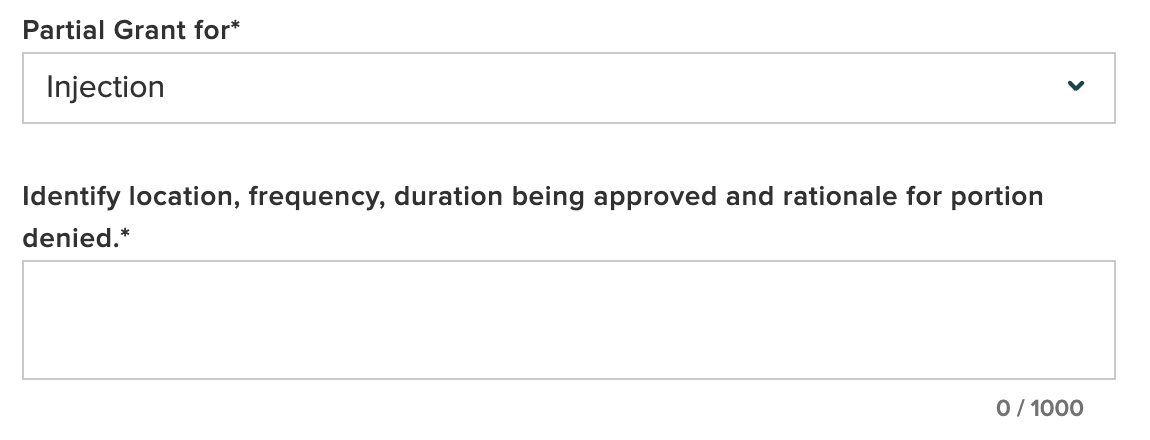
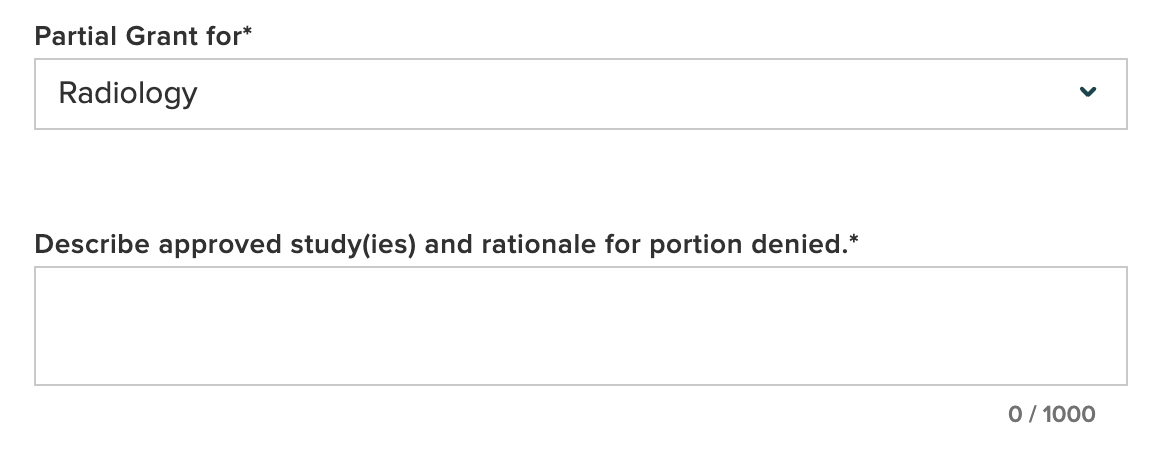
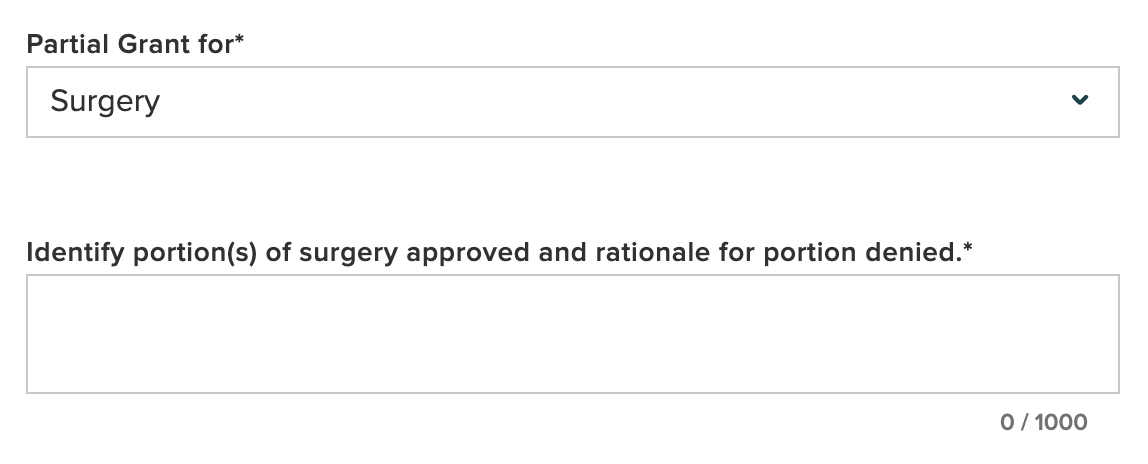
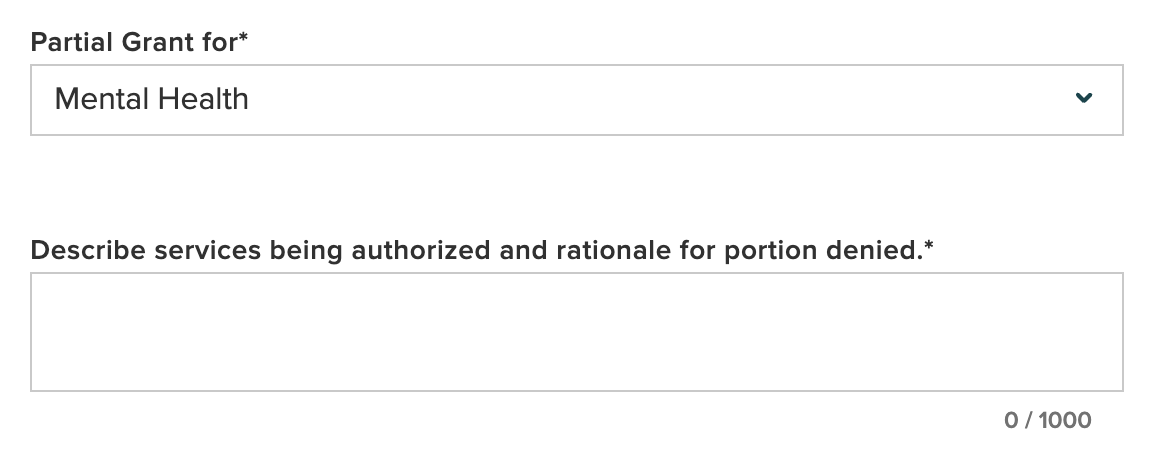
It is encouraged to provide as much detail as possible via the eForm, rather than uploading an attachment. Doing so will make the Level 2 reviewer's job easier if the PAR is escalated to a Level 2 review so they will not need to download and then reupload documentation that needs to be submitted with their response.
Select Insurer Response Details.
Claim apportioned
The question Is this claim apportioned? defaults to No.

If the claim is apportioned, select Yes and answer the additional required fields. The claim apportionment information included as the PAR response from one payer applies to all, and the apportionment fields allow the insurer to inform the provider of how to bill properly.
Respond to questions regarding Diagnostic Testing Network (DTN) and Preferred Provider Organization (PPO).
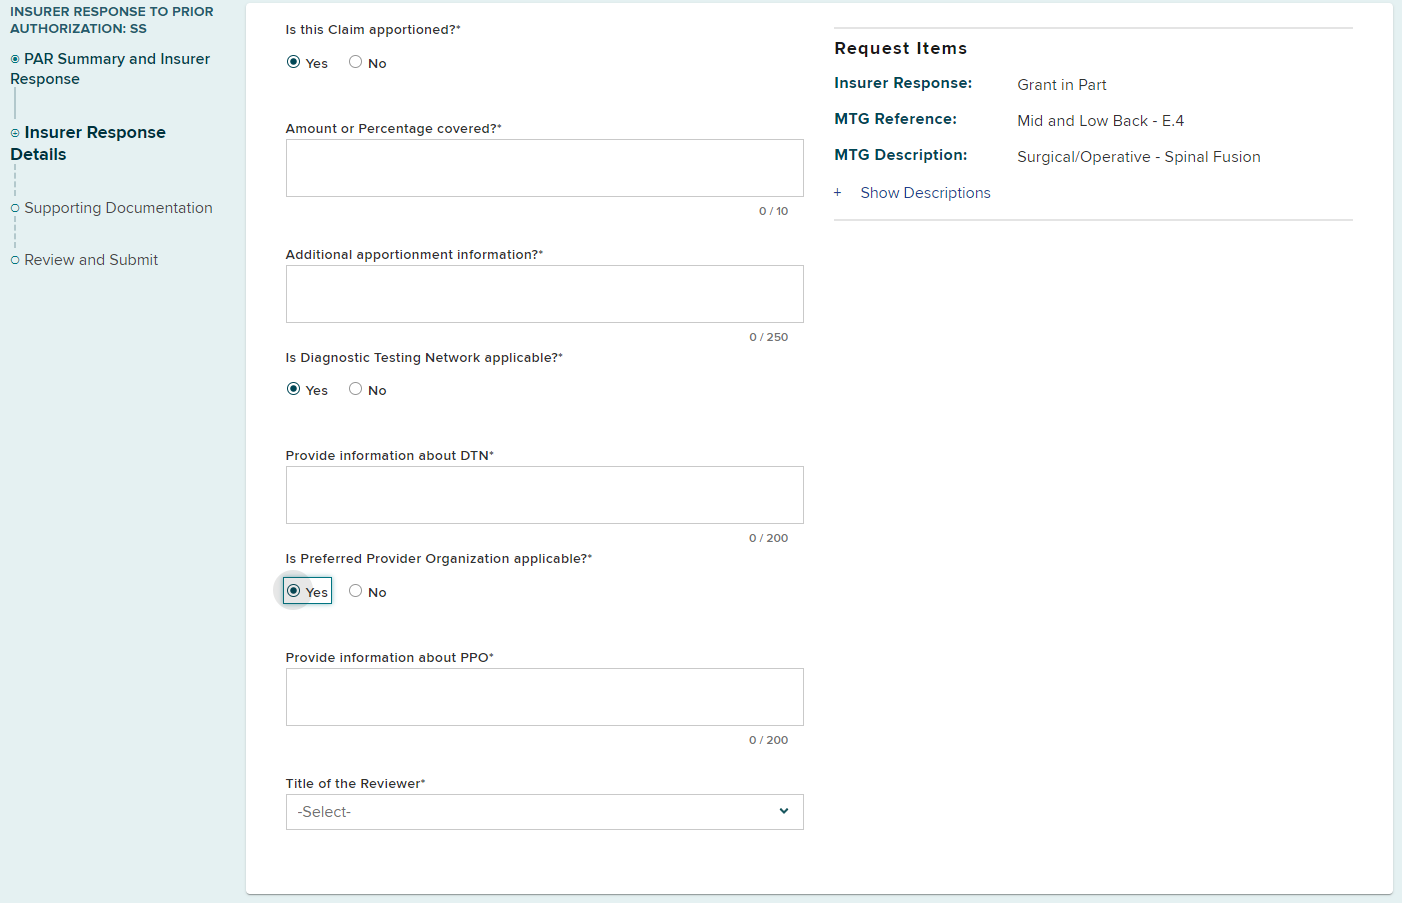
Select your title from the Title of the Reviewer drop-down list. If the appropriate title cannot be found, select Other and enter the appropriate title.
Select supporting documentation.
Uploading supporting documentation
Select Upload to add supporting documentation to the PAR response.

- Enter the type of document from the Type drop-down list.
- Enter a Description of the document being added.
- Select the Browse button to locate the file on your computer.
- Confirm the file is the correct file you want to upload.
- Select Upload.

The attachment has now been added to the PAR response.

If you selected Yes to Granted Without Prejudice and did not complete the fields regarding the FROI-Denial/SROI-Denial, you will be prompted to upload the corresponding required FROI-Denial and/or SROI-Denial forms.
Select Review and Submit.
Submit Response
Review all of the PAR response details and select Submit.
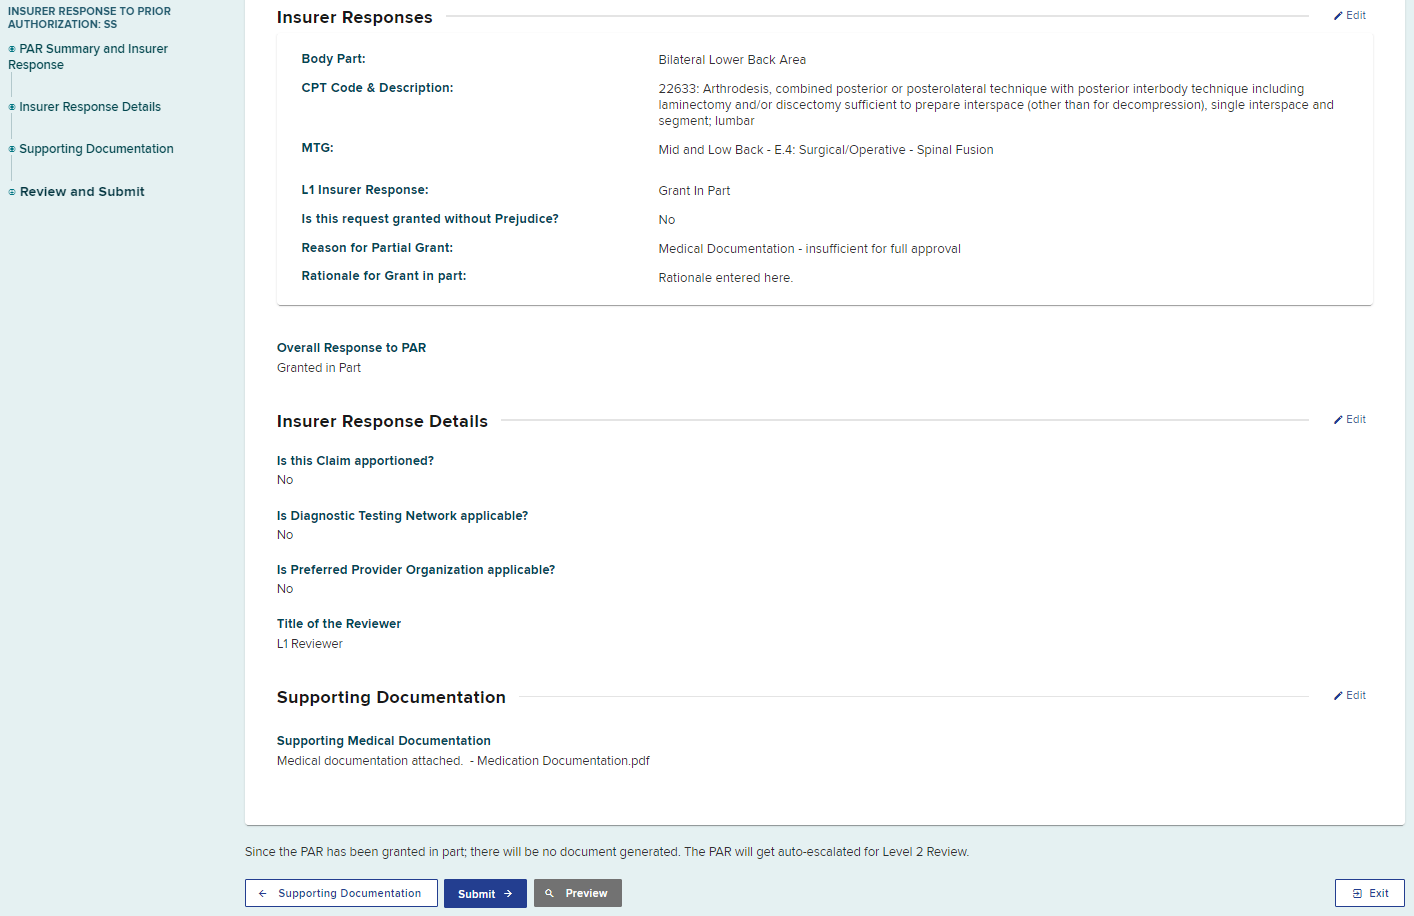
After the submission, a confirmation page will show the PAR was granted in part. You can print, download or view the complete eForm.
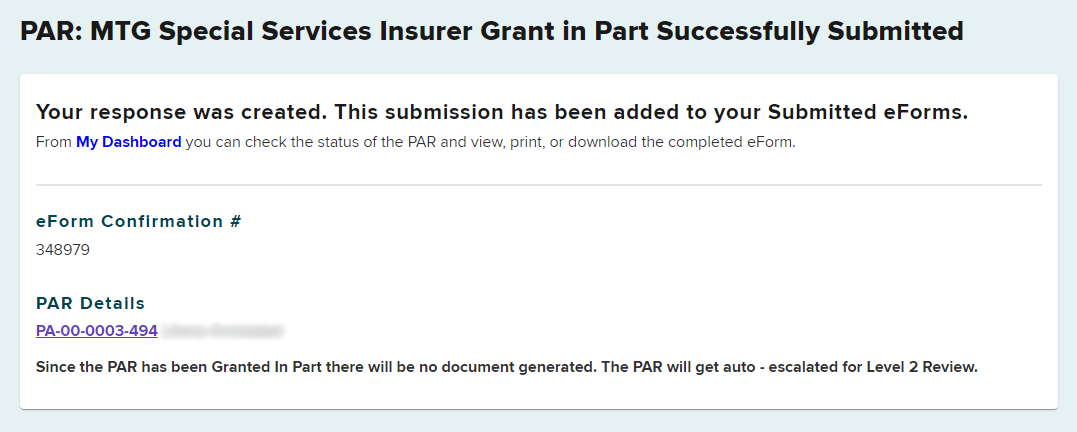
The PAR row will no longer appear on the My PARs tab.
The PAR response will show on the Submitted eForms tab.

Level 1 Grant in Part responses that are due to a medical reason are automatically escalated to Level 2 review.
Once a PAR you have responded to receives a final determination due to the PAR not being eligible for escalation; the provider chooses not to escalate a decision made by the payer; or the Board’s Medical Director’s Office issues a Notice of Resolution, the PAR will appear on the Prior Auth > Resolved tab.
Select Deny from the Insurer Response drop-down list.
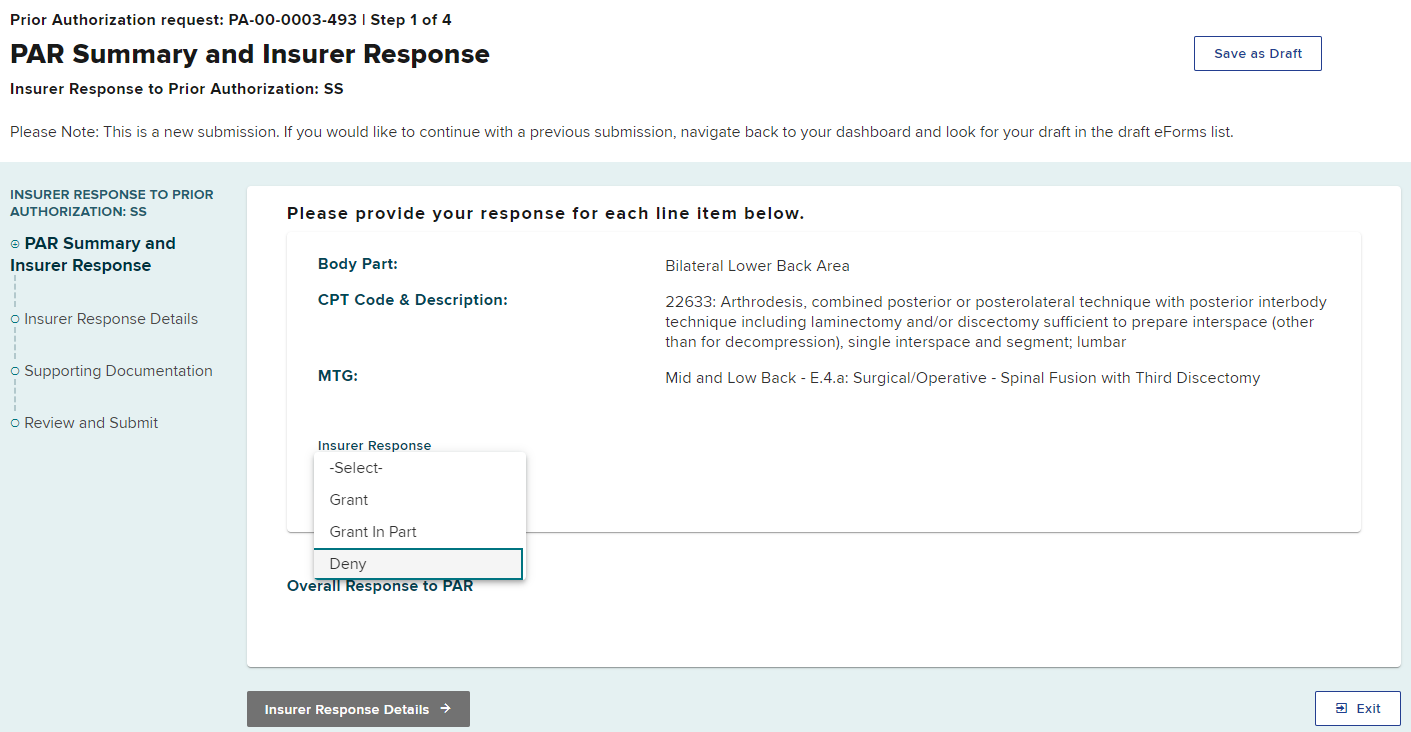
After selecting Deny, additional form fields will show.
-
Select the Denial Category from the drop-down list.

- The options for Denial Reason are dependent upon the Denial Category selected.
- Select the Denial Reason.
- If the Denial Category is Medical Reasons, more than one denial reason can be selected.
- Note: A Level 1 administrative denial in a controverted case that is filed without an IME for specialist consultations, surgical operations, physiotherapeutic or occupational therapy procedures, x-ray examinations or special diagnostic laboratory tests costing more than $1,000, would result in a waiver of the right to obtain an IME should the case later be established. These procedures can only be denied when there is a conflicting medical opinion by a Board authorized physician.
-
Enter the rationale for the denial in the text box.

It is encouraged to provide as much detail as applicable in the Rationale for Denial, rather than uploading an attachment.
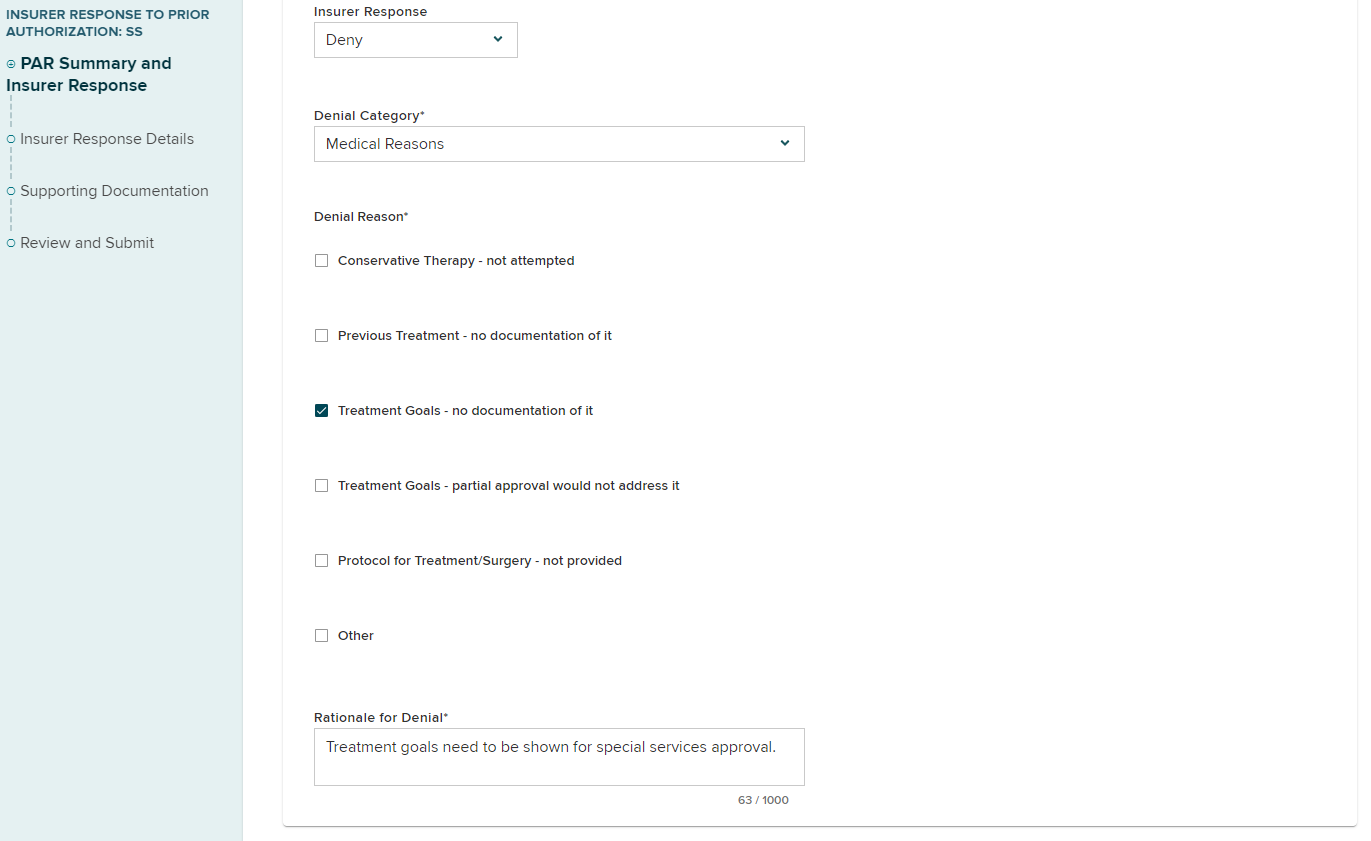
Select Insurer Response Details to continue.
Claim apportioned
The question Is this claim apportioned? defaults to No.

If the claim is apportioned, select Yes and answer the additional required fields. The claim apportionment information included as the PAR response from one payer applies to all, and the apportionment fields allow the insurer to inform the provider of how to bill properly.
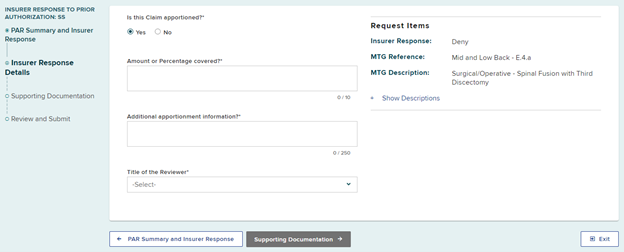
Select your title from the Title of the Reviewer drop-down list. If the appropriate title cannot be found, select Other and enter the appropriate title.
Select supporting documentation.
Uploading supporting documentation
Select Upload to add supporting documentation to the PAR response.

- Enter the type of document from the Type drop-down list.
- Enter a Description of the document being added.
- Select the Browse button to locate the file on your computer.
- Confirm the file is the correct file you want to upload.
- Select Upload.

The attachment has now been added to the PAR response.

Select Review and Submit.
Submit Response
Review all of the PAR response details and select Submit.
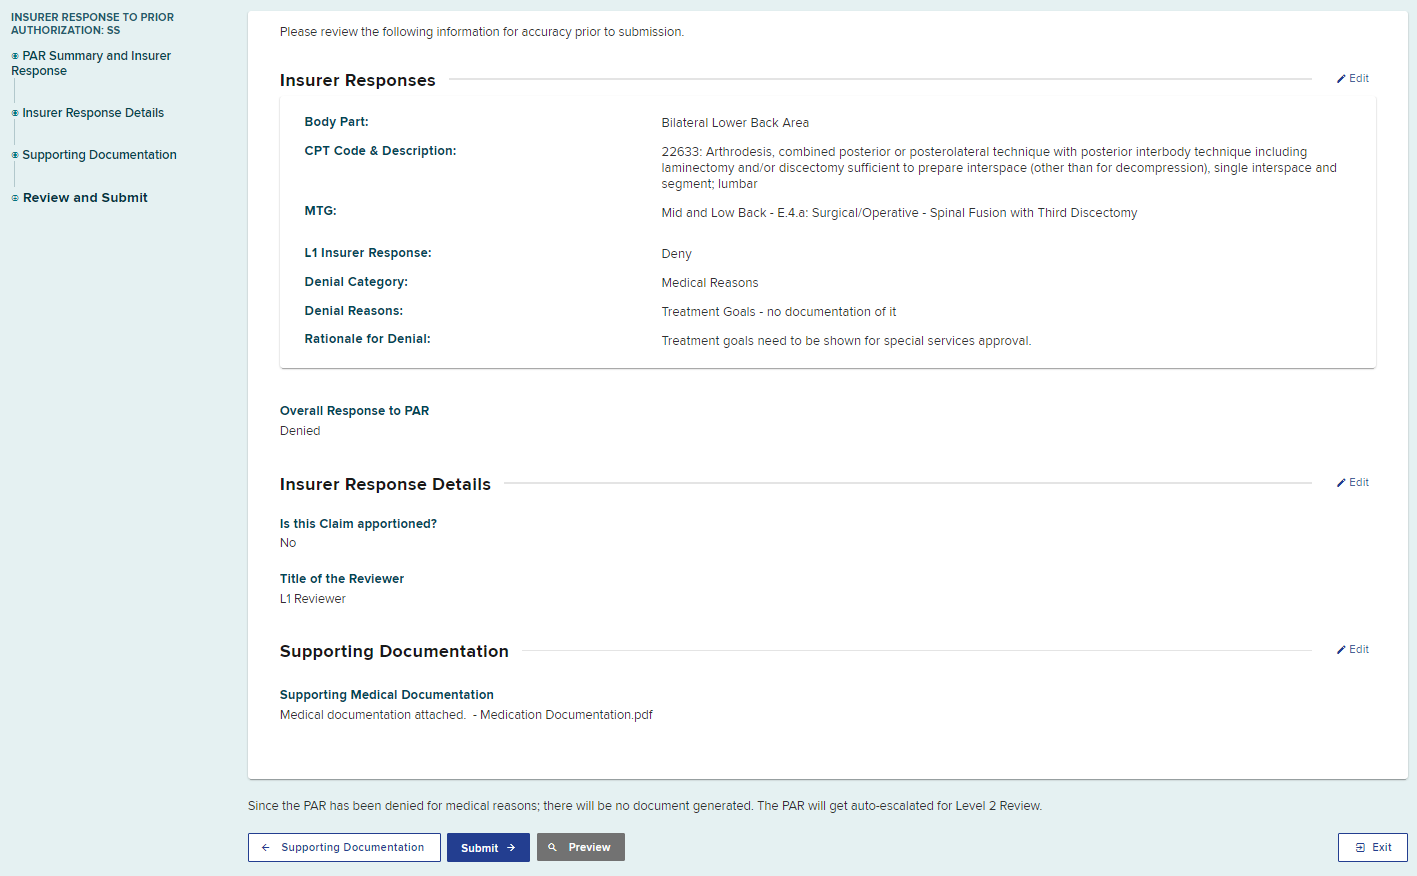
After the submission, a confirmation page will show the PAR was denied. You can print, download, or view the complete eForm.
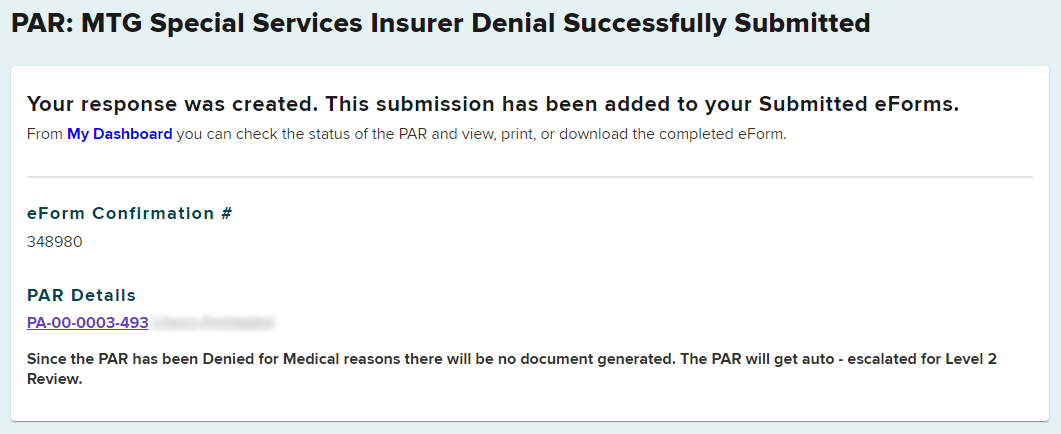
The PAR row will no longer appear on the My PARs tab.
The PAR response will show on the Submitted eForms tab.

PARs denied for to a medical reason will be automatically escalated for Level 2 review.
Once a PAR you have responded to receives a final determination due to the PAR not being eligible for escalation; the provider chooses not to escalate a decision made by the payer; or the Board’s Medical Director’s Office issues a Notice of Resolution, the PAR will appear on the Prior Auth > Resolved tab.
Treatment/Testing PAR - Level 2 Review
Note: This example will use a MTG Special Services PAR. Other PAR categories or specific responses within MTG Special Services will have different questions and/or form fields. The process for each is the same with varying information needed.
On the dashboard, the Prior Auth > My PARs tab will update with new prior authorization requests (PARs) that require a Level 2 Review. The PAR Status column indicates the level of review needed. The Due Date column is the date the payer is required to respond. If the payer does not respond within the designated time frame, an Order of the Chair may be issued.
Responding to request
To respond to a request, select the PAR ID link to open the PAR Details page.

Review all sections of the PAR details, including the Request Details which shows the Level 1 response details, Documents uploaded by the health care provider or Level 1 reviewer, Correspondence History, etc.
Select the Actions button on the top right of the PAR Details page to respond to the request or request more information.
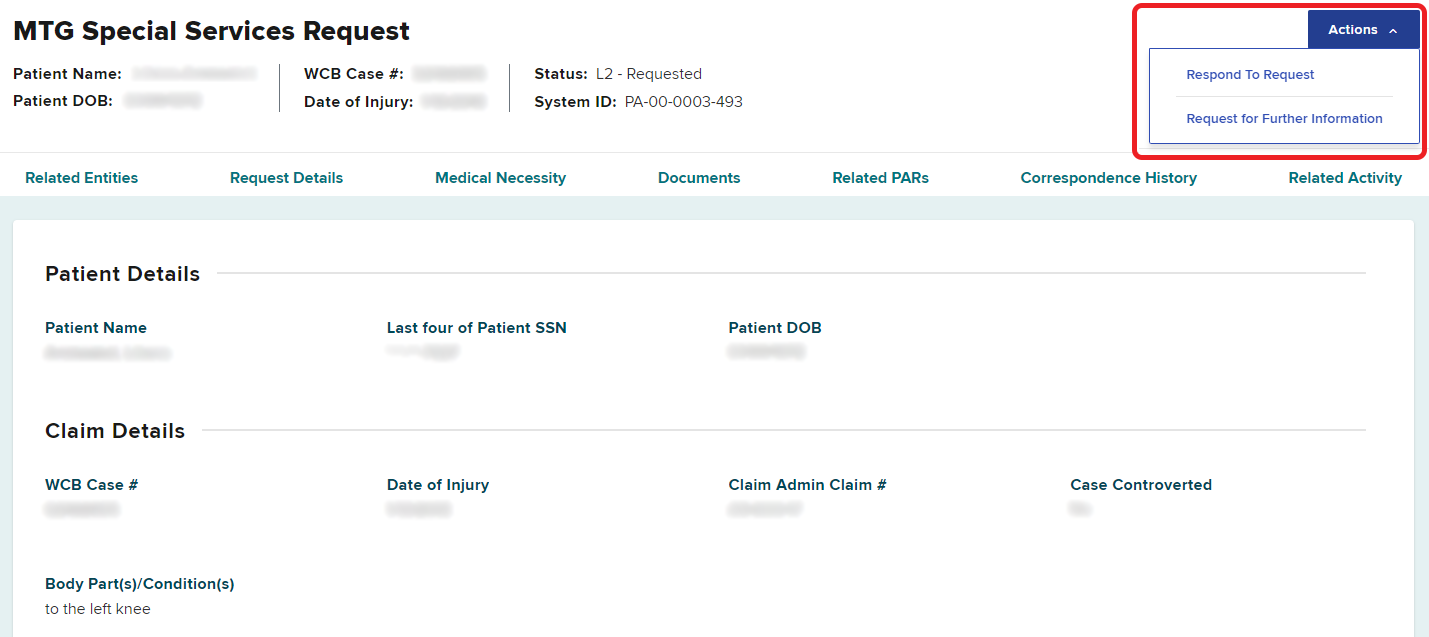
Request for Further Information (RFI)
If more information is needed from the provider in order to respond to the PAR, select Request for Further Information. The due date for the reviewer to respond to a PAR is not extended when there is a request for more information made or if the request for more information never receives a response.
If an RFI was requested by the Level 1 reviewer, the RFI column on the My PARs tab will have either Sent if the provider did not respond to the request, or Rec'd if the provider did respond to the request. Details of that request can be found in the Correspondence section of the PAR Details page.
Learn how to send a request for further information, and view the response from the provider.
Independent medical exam (IME)
If an IME needs to be conducted before responding to an MTG Variance or MTG Special Services PAR, a notification should be sent using OnBoard to the requesting health care provider within five days of the PAR's submission date. When the IME Requested Notification is timely sent to the provider, the timeframe for response will automatically be extended from 15 days to 30 days.
Learn how to send an Independent Medical Exam Request Notification.
Level 2 Insurer Response
To issue a determination on the submitted PAR, select the Actions button at the top right of the PAR Details page and select Respond to Request.
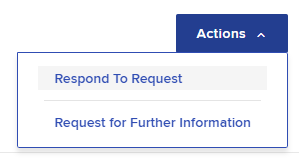
A Level 2 reviewer can grant the request, grant part of the request or deny the request. Select the option you would like to take on the PAR to see the steps to respond.
On the PAR response eForm, select the Insurer Response drop-down list and select Grant.
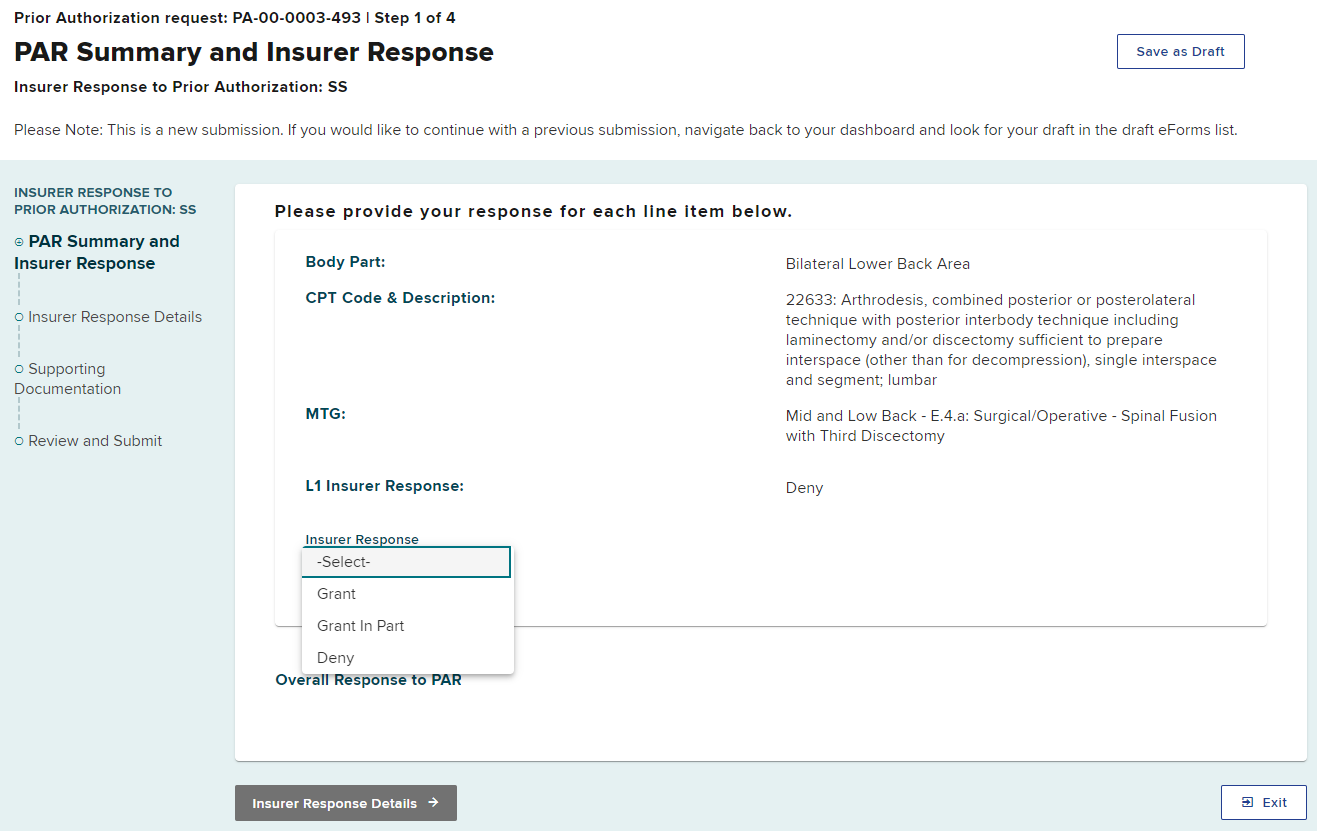
Granted Without Prejudice
The question Is this request granted without Prejudice? defaults to No.
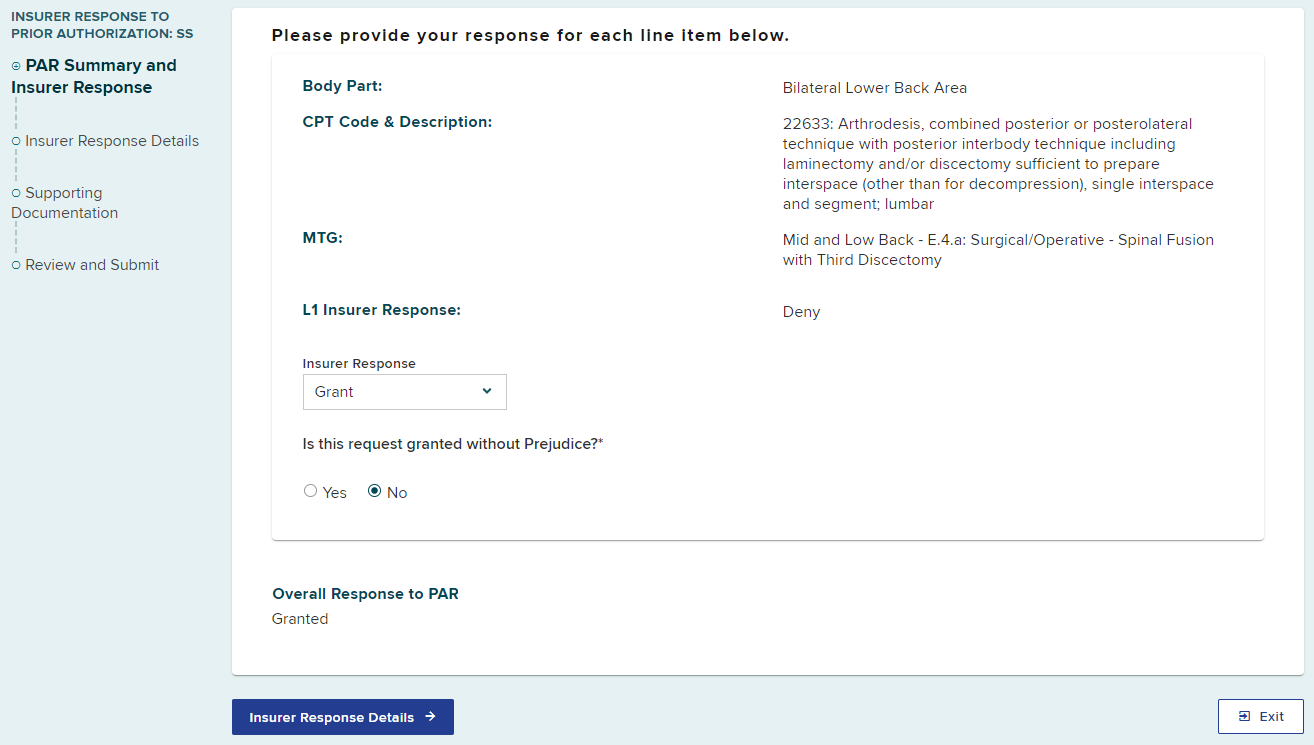
A "grant without prejudice" can only happen when either:
- A denial (First Report of Injury [FROI-04] or Subsequent Report of Injury [SROI-04]) has been filed in the case and the controversy is still pending; or
- The body part or condition has not been accepted (with or without liability) on a FROI/SROI or established by decision of the Board.
If the request is granted without prejudice, select Yes.
- If the reason for granting without prejudice is Claim Controverted, you will need to complete the additional fields regarding the FROI-Denial/SROI-Denial.
- You can find the FROI-Denial/SROI-Denial date and WCB Document ID number in eCase.
- If the documents are not available in eCase, upload a copy in the supporting documents portion of the eForm.
- You may enter additional rationale for granting without prejudice due to the claim being controverted in the text field.
- If the reason for granting without prejudice is Body Part/Condition Not Accepted or Established:
- Enter additional rationale for granting without prejudice in the text field.
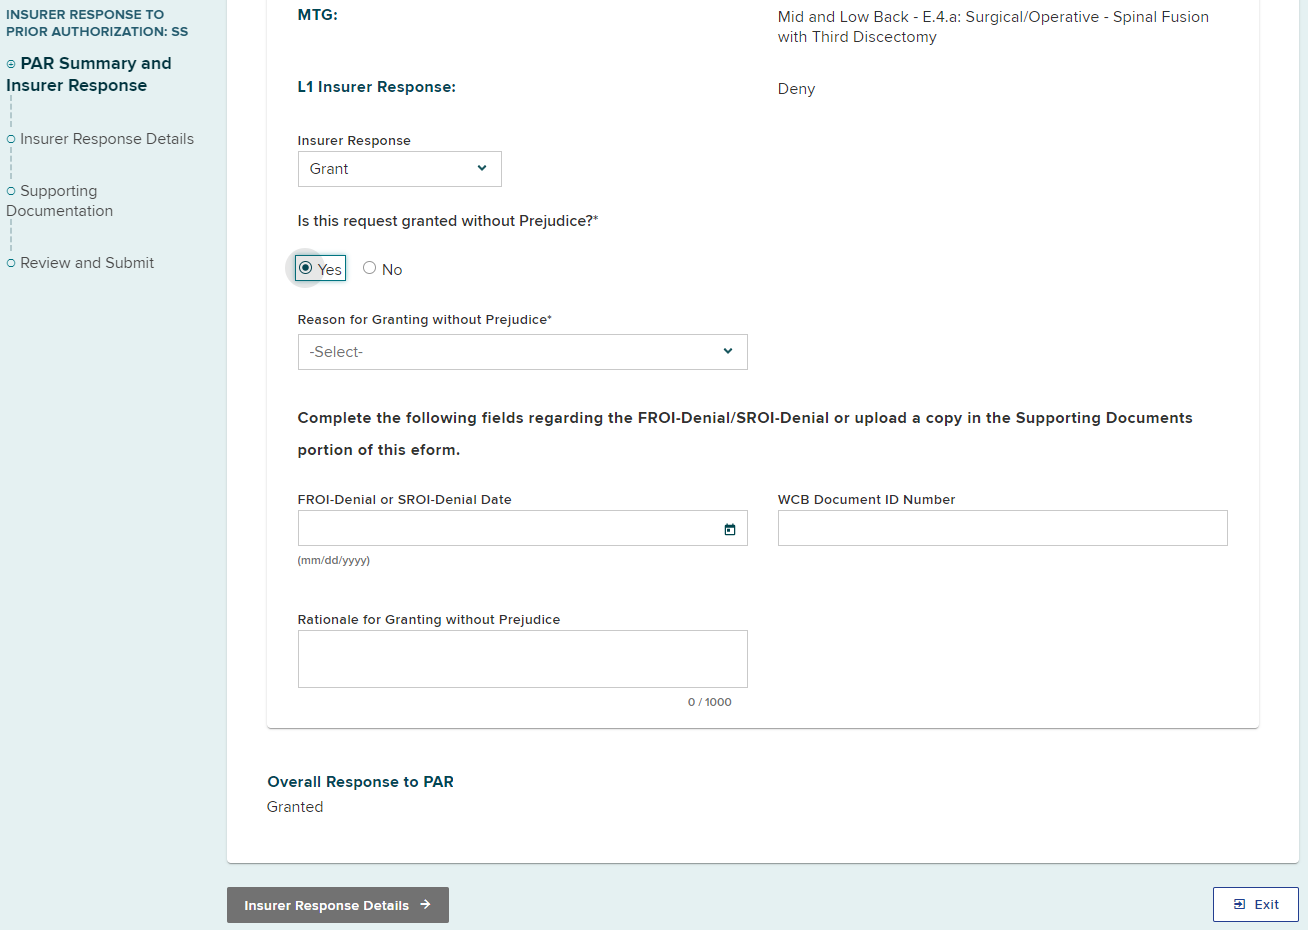
Select the Insurer Response Details button.
Claim apportioned
The question Is this claim apportioned? defaults to No.
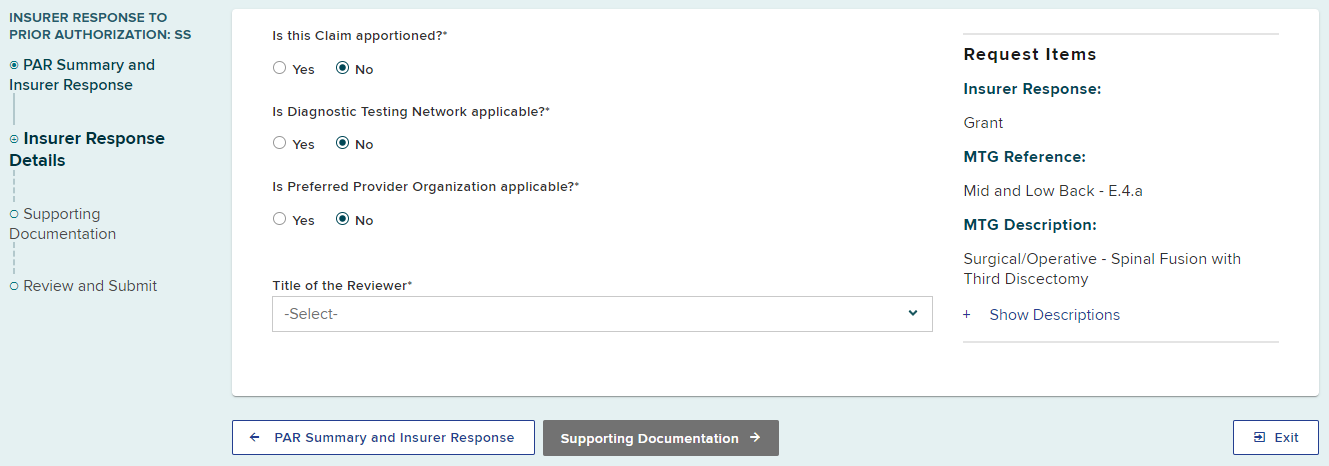
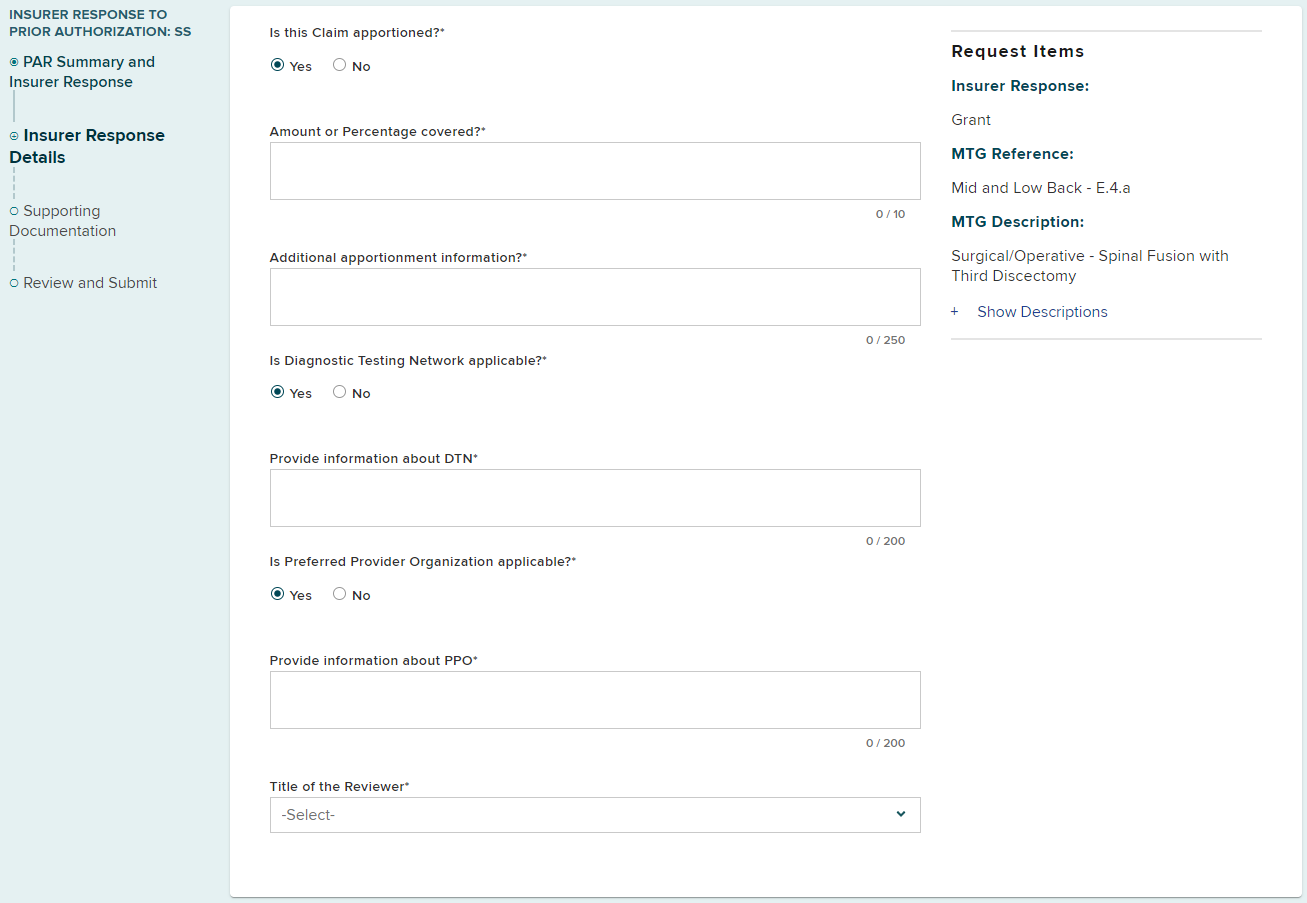
If the claim is apportioned, select Yes and answer the additional required fields. The claim apportionment information included as the PAR response from one payer applies to all, and the apportionment fields allow the insurer to inform the provider of how to bill properly.
Respond to questions regarding Diagnostic Testing Network (DTN) and Preferred Provider Organization (PPO)
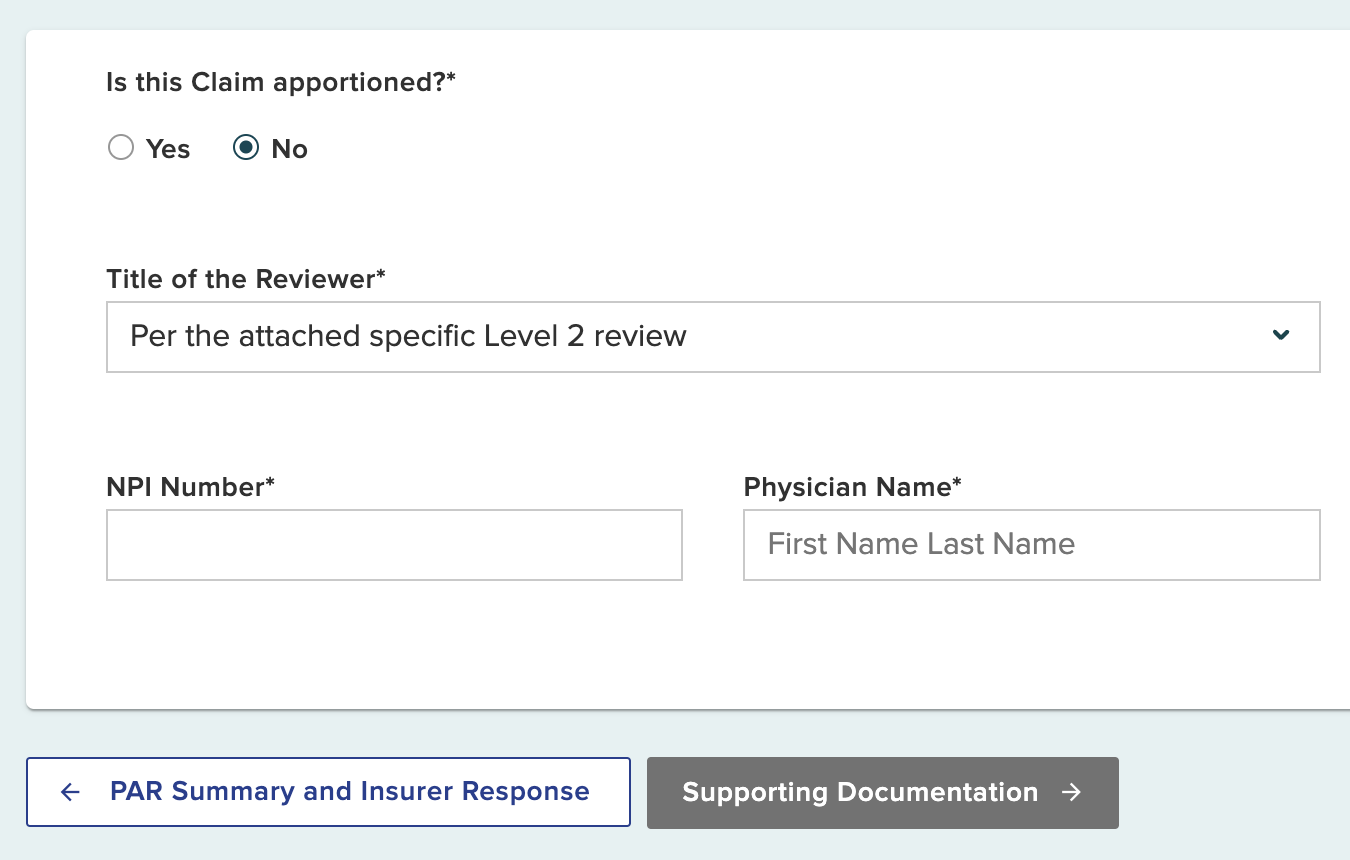
Select your title from the Title of the Reviewer drop-down list. If the appropriate title cannot be found, select Per the attached specific Level 2 review, enter the NPI Number, and the Physician Name.
Select supporting documentation.
Uploading supporting documentation
If your response is based on a document uploaded by the Level 1 reviewer, you will need to download the document and upload it as part of your response to ensure that the document will be transitioned to eCase.
- Open your dashboard in a new tab (right click "My Dashboard" and select "Open Link in New Tab"); or
- Save your current response as a draft to finish later.
- From the Documents section of the PAR Details page, select the Actions button at the end of the row containing the document the Level 1 reviewer uploaded as part of their response.
- Select Download Document.
- Navigate back to your PAR submission to continue your response.
Select Upload to add supporting documentation to the PAR response.

- Enter the type of document from the Type drop-down list.
- Enter a Description of the document being added.
- Select the Browse button to locate the file on your computer.
- Confirm the file is the correct file you want to upload.
- Select Upload.

The attachment has now been added to the PAR response.

If you selected Yes to Granted Without Prejudice with a reason of Claim Controverted and did not complete the fields regarding the FROI-Denial/SROI-Denial, you will be prompted to upload the corresponding required FROI-Denial and/or SROI-Denial forms.

Select Review and Submit.
Submit Response
Review all of the PAR response details and select Submit.
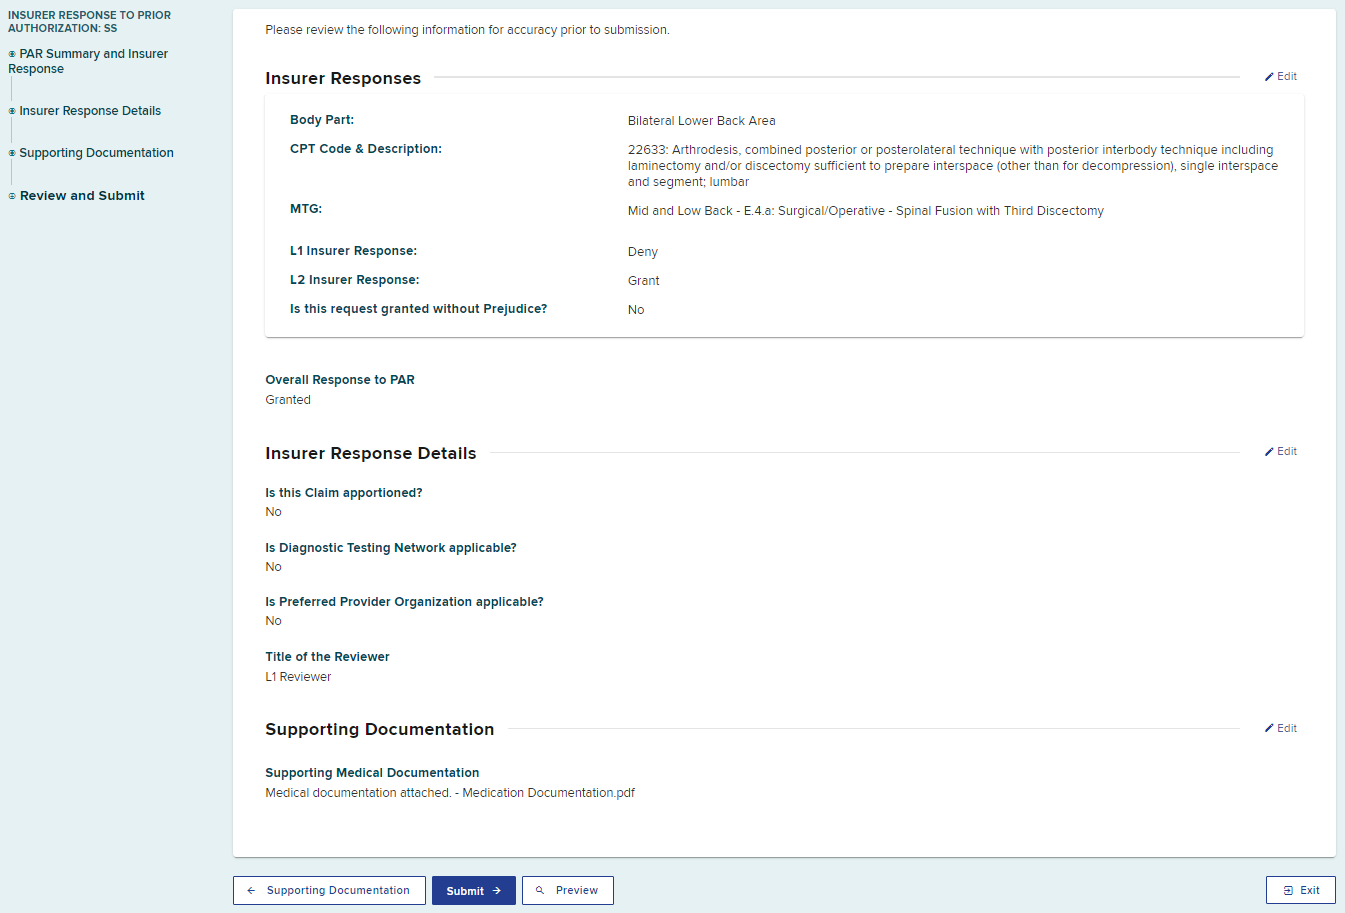
After the submission, a confirmation page will show the PAR was granted. You can print, download or view the complete eForm.
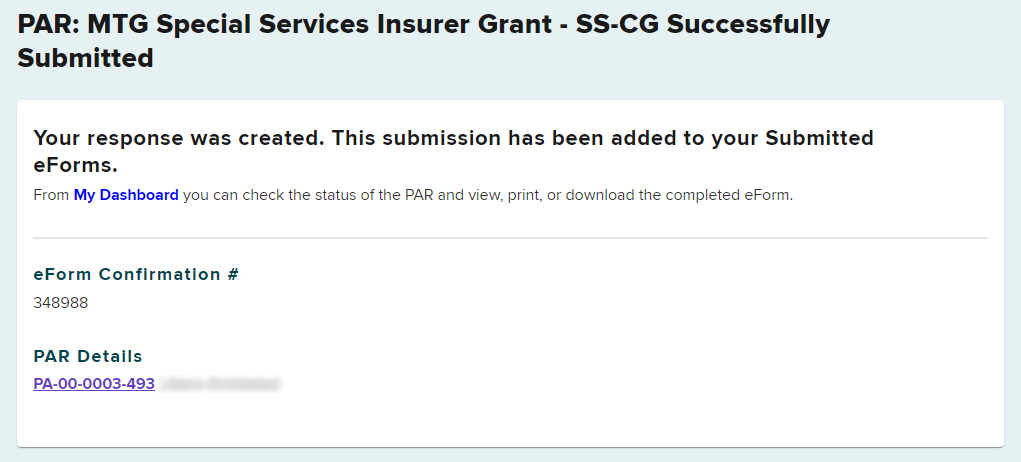
The PAR row will no longer appear on the My PARs tab.
The PAR response will show on the Submitted eForms tab.

It will also appear in the Prior Auth > Resolved tab.

Select Grant in Part from the Insurer Response drop-down list.
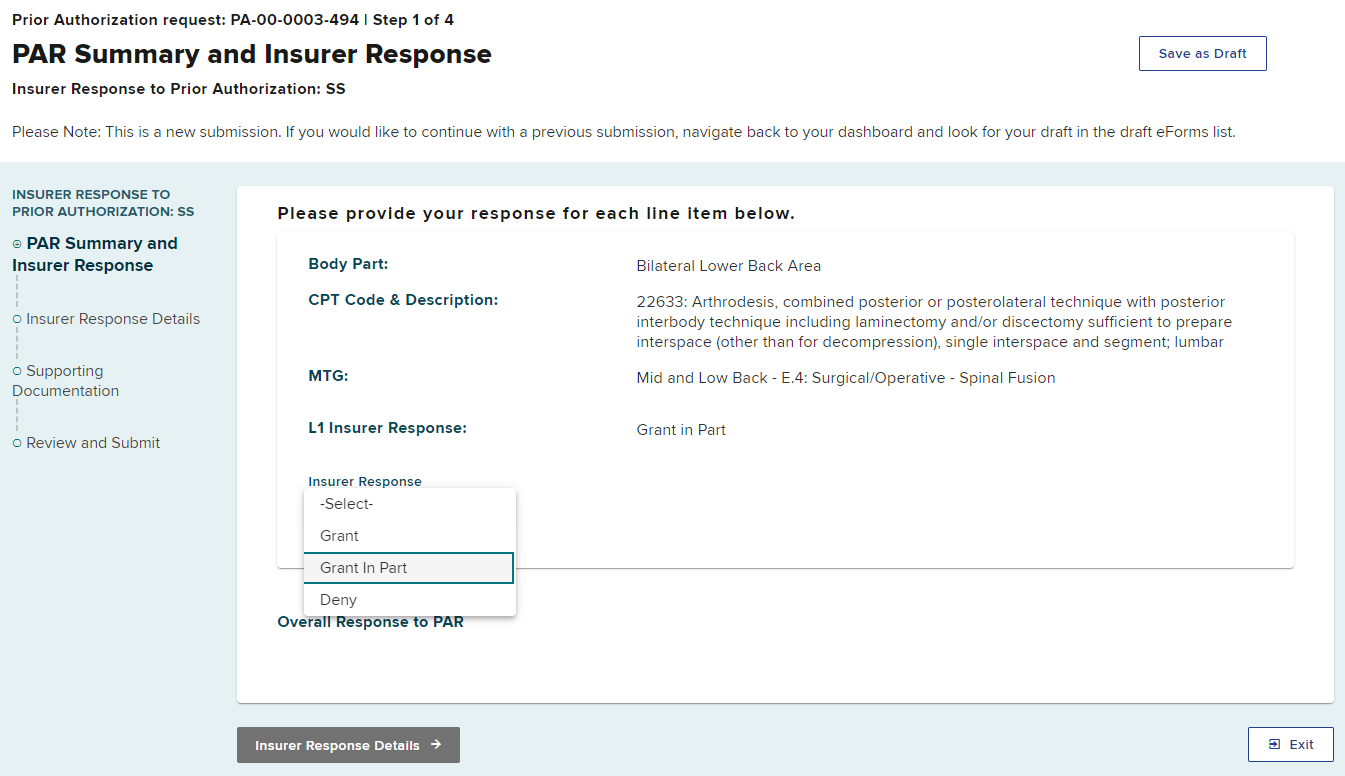
Granted Without Prejudice
The question Is this request granted without Prejudice? defaults to No.
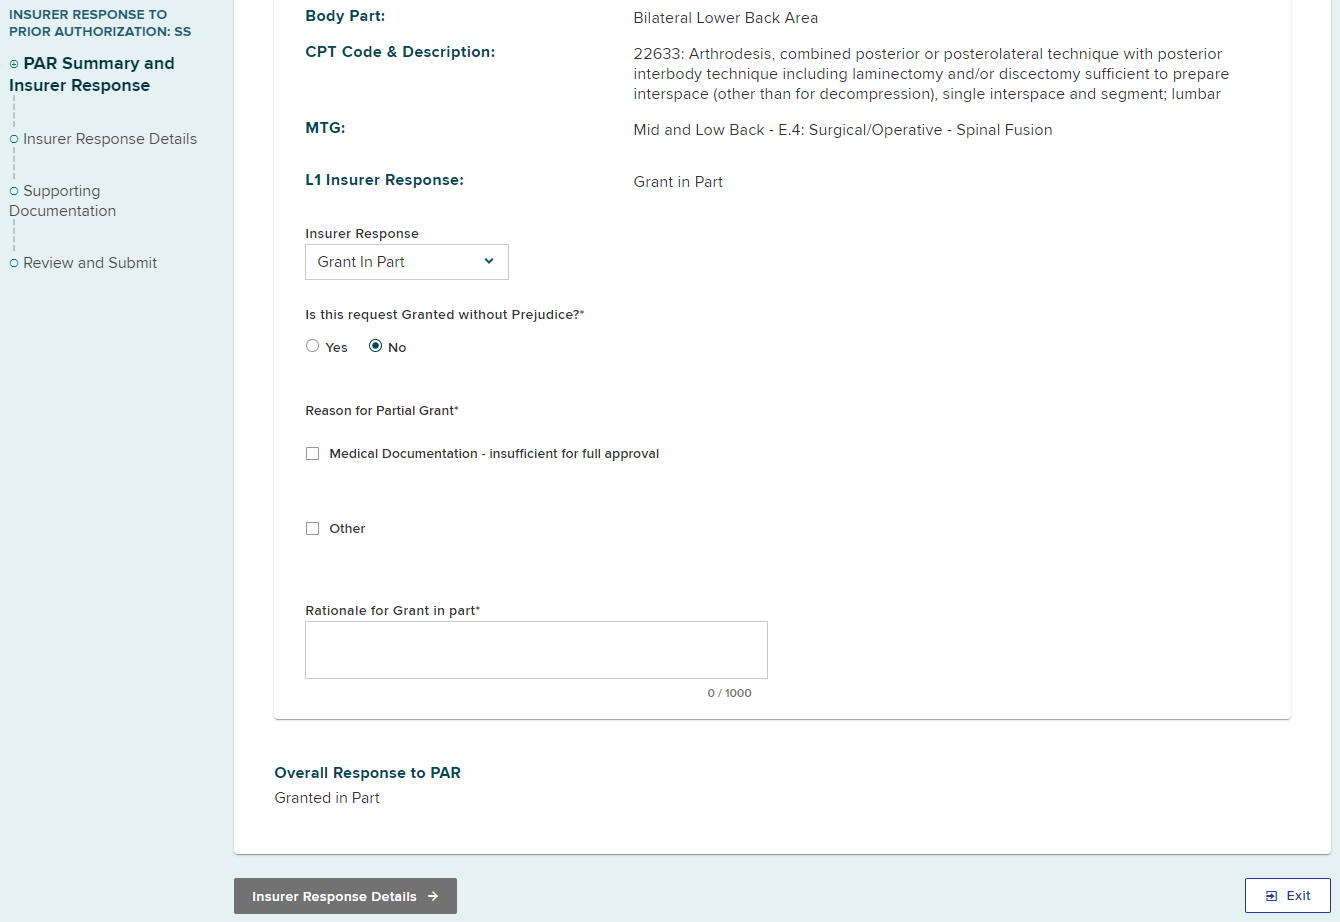
A "grant without prejudice" can only happen when either:
- A denial (First Report of Injury [FROI-04] or Subsequent Report of Injury [SROI-04]) has been filed in the case and the controversy is still pending; or
- The body part or condition has not been accepted (with or without liability) on a FROI/SROI or established by decision of the Board.
If the request is granted without prejudice, select Yes.
- If the reason for granting without prejudice is Claim Controverted, you will need to complete the additional fields regarding the FROI-Denial/SROI-Denial.
- You can find the FROI-Denial/SROI-Denial date and WCB Document ID number in eCase.
- If the documents are not available in eCase, upload a copy in the supporting documents portion of the eForm.
- You may enter additional rationale for granting without prejudice due to the claim being controverted in the text field.
- If the reason for granting without prejudice is Body Part/Condition Not Accepted or Established:
- Enter additional rationale for granting without prejudice in the text field.
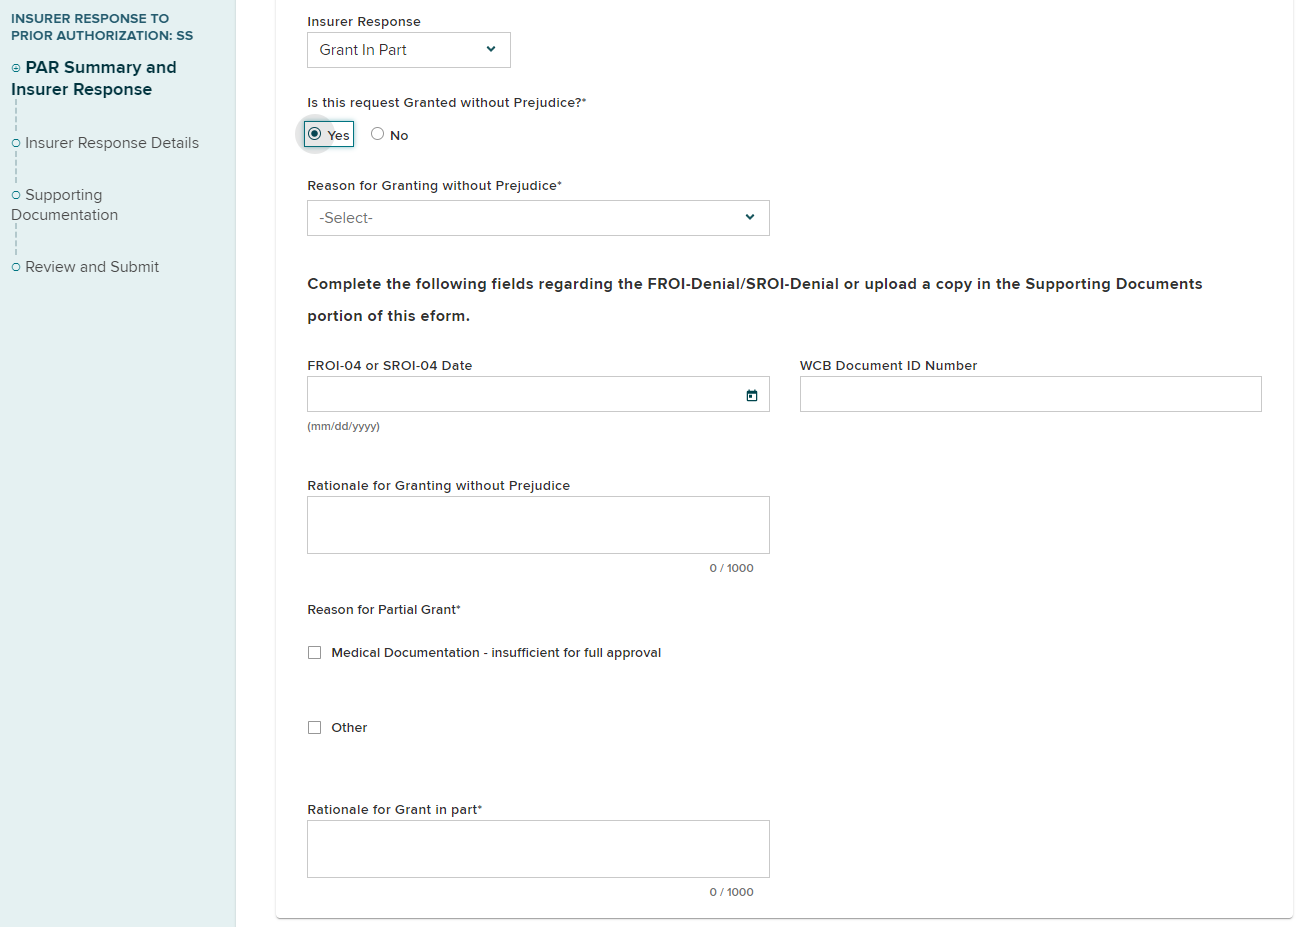
Continue entering required information regarding why the request is being granted in part.
Select the Insurer Response Details button.
Claim apportioned
The question Is this claim apportioned? defaults to No.
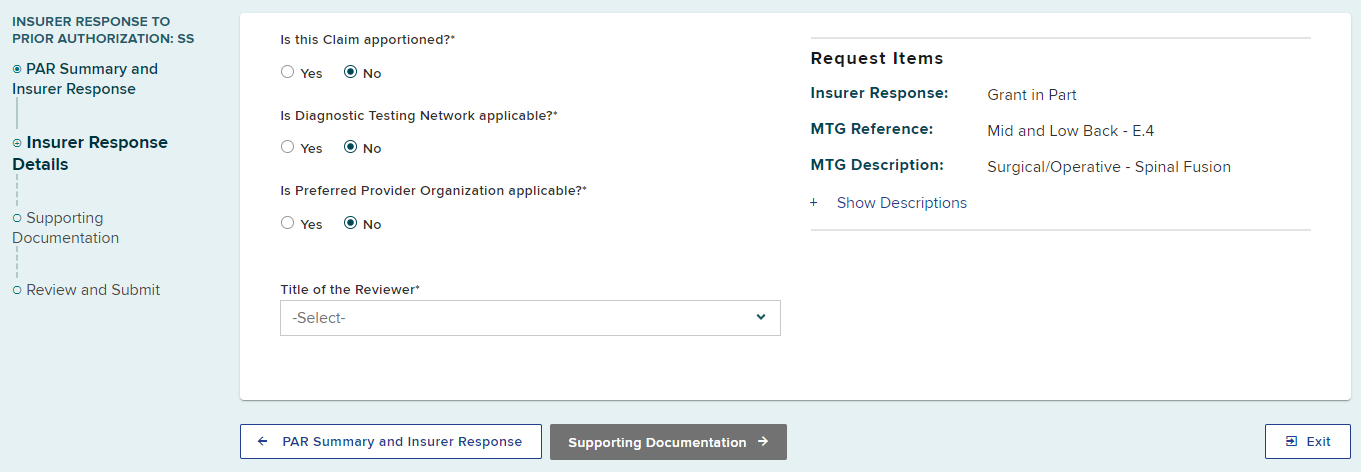
If the claim is apportioned, select Yes and answer the additional required fields. The claim apportionment information included as the PAR response from one payer applies to all, and the apportionment fields allow the insurer to inform the provider of how to bill properly.
Respond to questions regarding Diagnostic Testing Network (DTN) and Preferred Provider Organization (PPO)
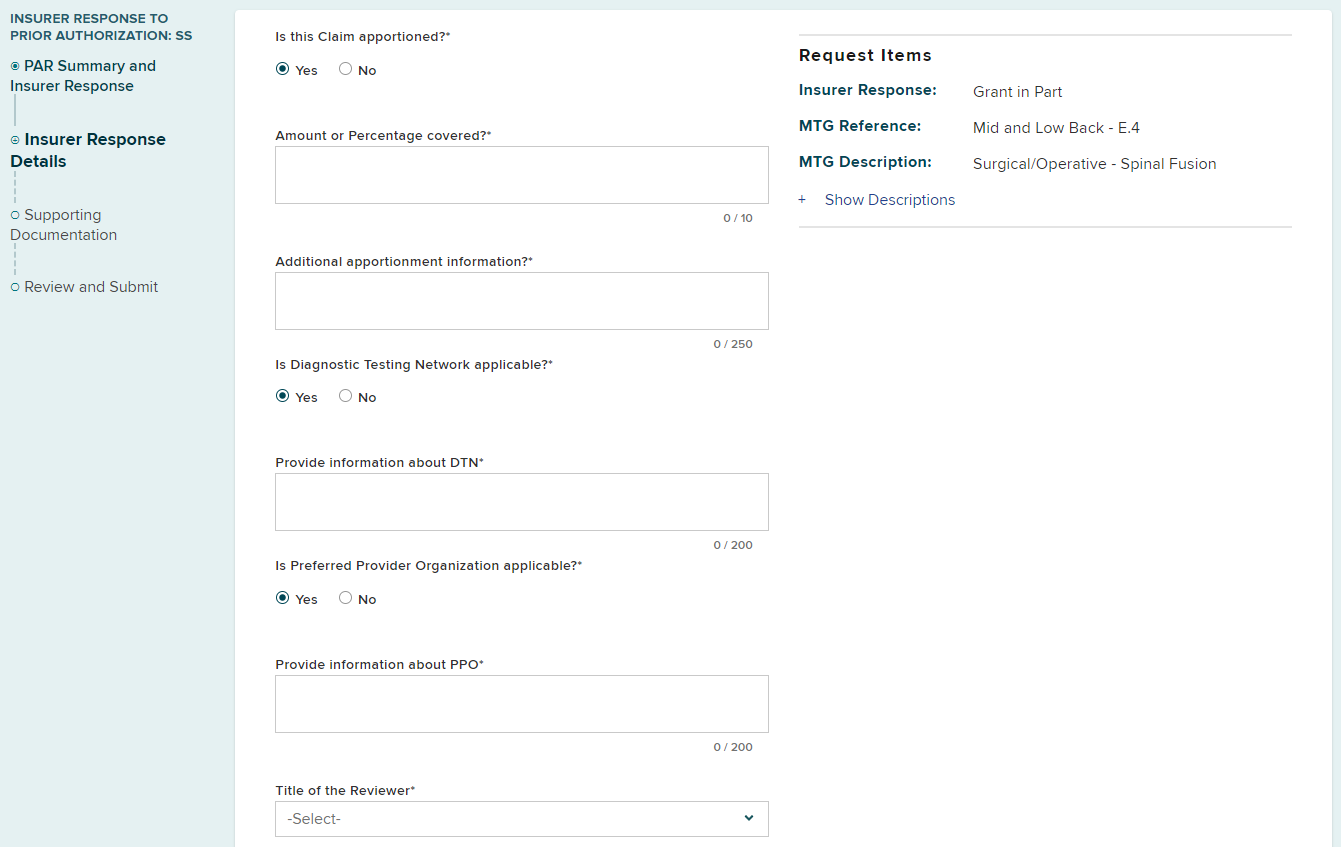
Select your title from the Title of the Reviewer drop-down list. If the appropriate title cannot be found, select Per the attached specific Level 2 review, enter the NPI Number, and the Physician Name.

Select supporting documentation.
Uploading supporting documentation
If your response is based on a document uploaded by the Level 1 reviewer, you will need to download the document and upload it as part of your response to ensure that the document will be transitioned to eCase.
- Open your dashboard in a new tab (right click "My Dashboard" and select "Open Link in New Tab"); or
- Save your current response as a draft to finish later.
- From the Documents section of the PAR Details page, select the Actions button at the end of the row containing the document the Level 1 reviewer uploaded as part of their response.
- Select Download Document.
- Navigate back to your PAR submission to continue your response.
Select Upload to add supporting documentation to the PAR response.

- Enter the type of document from the Type drop-down list.
- Enter a Description of the document being added.
- Select the Browse button to locate the file on your computer.
- Confirm the file is the correct file you want to upload.
- Select Upload.

The attachment has now been added to the PAR response.

If you selected Yes to Granted Without Prejudice with a reason of Claim Controverted and did not complete the fields regarding the FROI-Denial/SROI-Denial, you will be prompted to upload the corresponding required FROI-Denial and/or SROI-Denial forms.

Select Review and Submit.
Submit Response
Review all of the PAR response details and select Submit.
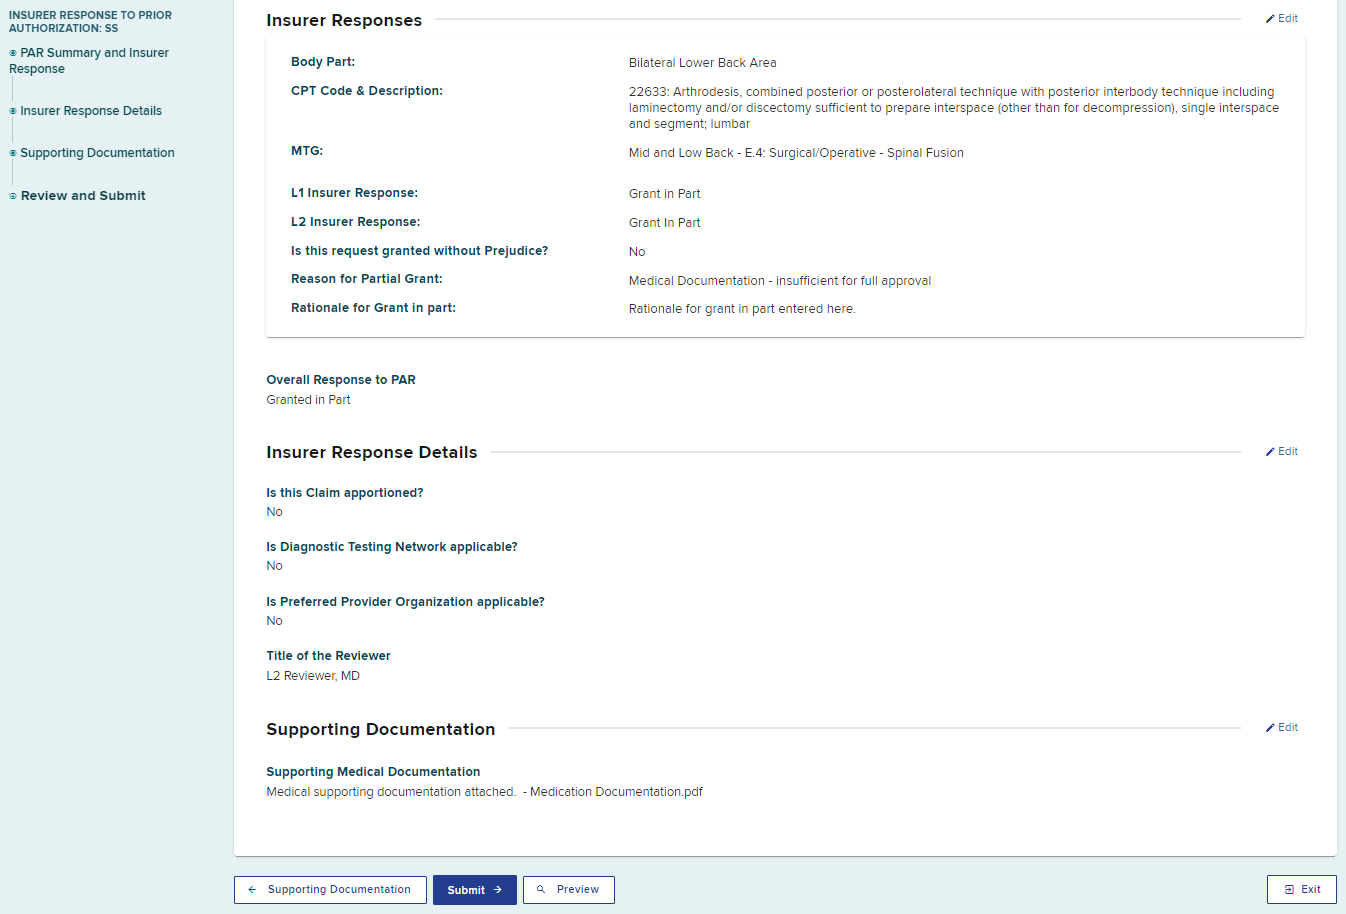
After the submission, a confirmation page will show the PAR was granted in part. You can print, download, or view the complete eForm.
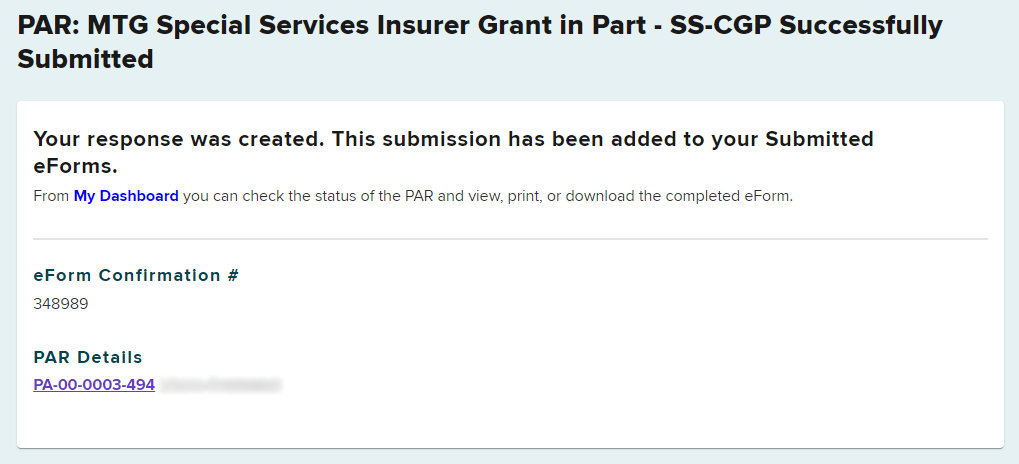
The PAR row will no longer appear on the My PARs tab.
The PAR response will show on the Submitted eForms tab.

Once a PAR you have responded to receives a final determination due to the PAR not being eligible for escalation; the provider chooses not to escalate a decision made by the payer; or the Board’s Medical Director’s Office issues a Notice of Resolution, the PAR will appear on the Prior Auth > Resolved tab.
Select Deny from the Insurer Response drop-down list.
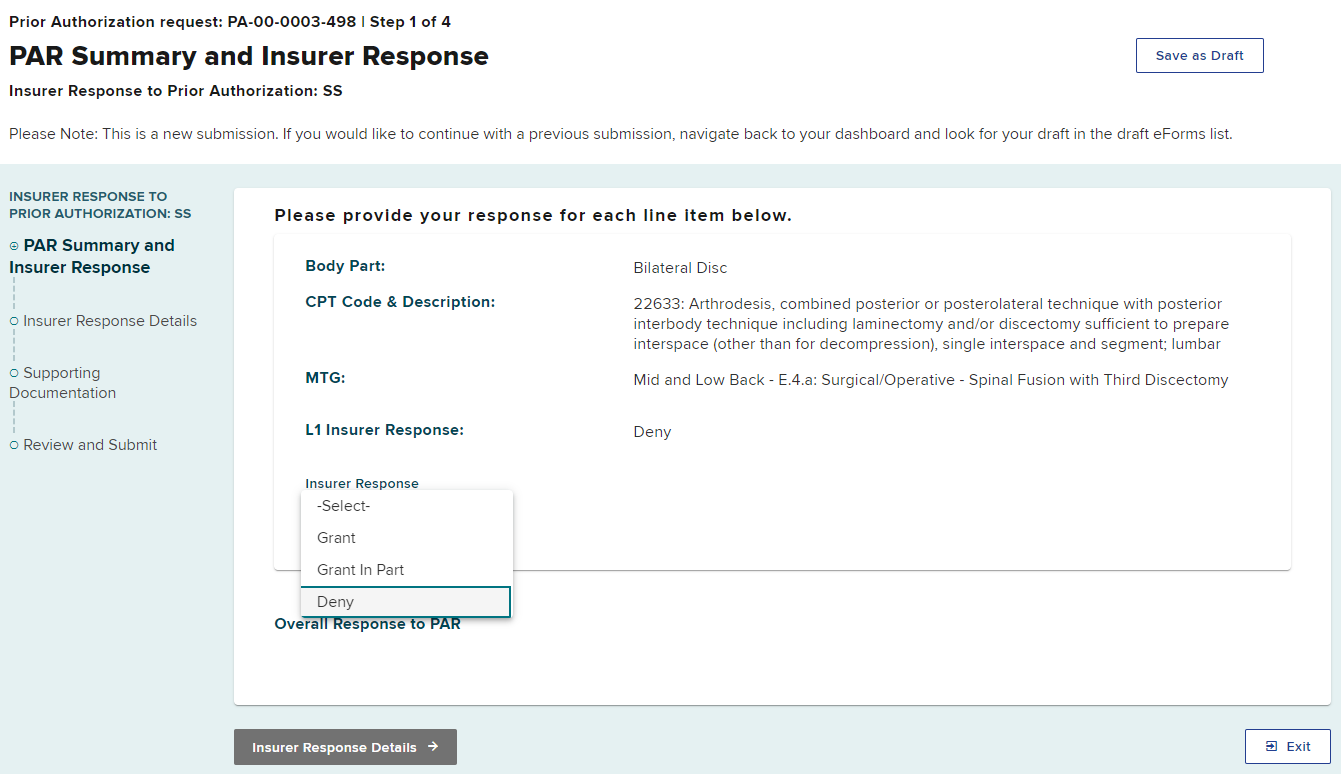
After selecting Deny, additional form fields will show.
-
Select the Denial Category from the drop-down list.

- The options for Denial Reason are dependent upon the Denial Category selected.
- Select the Denial Reason.
- If the Denial Category is Medical Reasons, more than one denial reason can be selected.
-
Enter the rationale for the denial in the text box.

Select Insurer Response Details to continue.
Claim apportioned
The question Is this claim apportioned? defaults to No.

If the claim is apportioned, select Yes and answer the additional required fields. The claim apportionment information included as the PAR response from one payer applies to all, and the apportionment fields allow the insurer to inform the provider of how to bill properly.
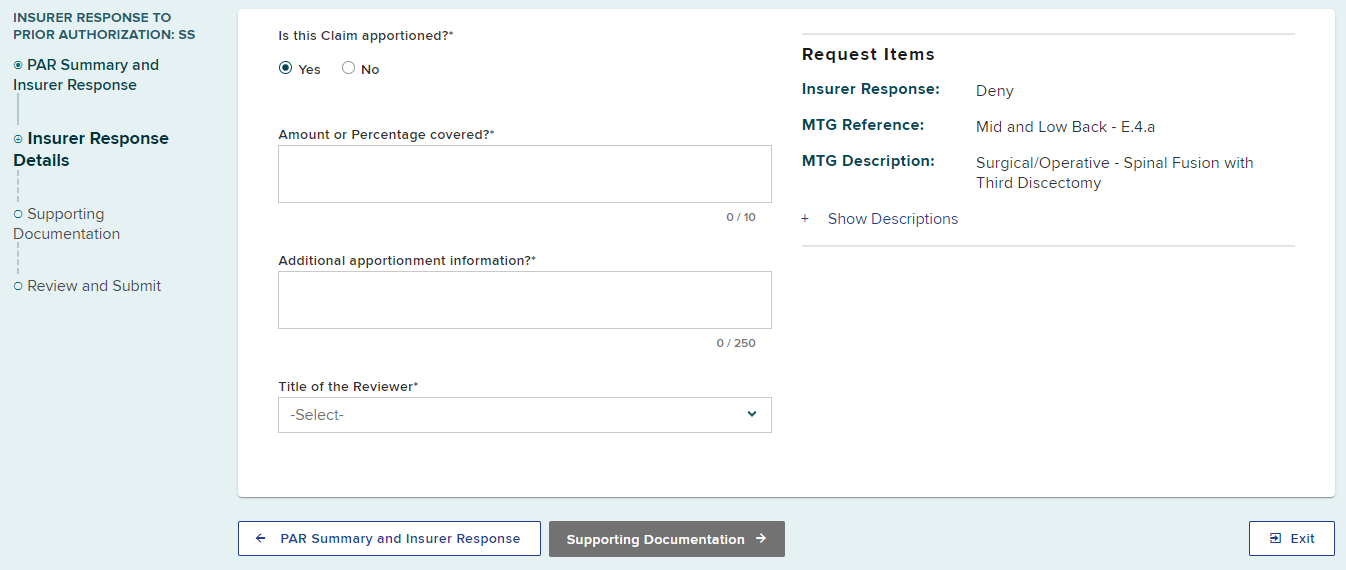
Select your title from the Title of the Reviewer drop-down list. If the appropriate title cannot be found, select Per the attached specific Level 2 review, enter the NPI Number, and the Physician Name.

Select supporting documentation.
Uploading supporting documentation
If your response is based on a document uploaded by the Level 1 reviewer, you will need to download the document and upload it as part of your response to ensure that the document will be transitioned to eCase.
- Open your dashboard in a new tab (right click "My Dashboard" and select "Open Link in New Tab"); or
- Save your current response as a draft to finish later.
- From the Documents section of the PAR Details page, select the Actions button at the end of the row containing the document the Level 1 reviewer uploaded as part of their response.
- Select Download Document.
- Navigate back to your PAR submission to continue your response.
Select Upload to add supporting documentation to the PAR response.

- Enter the type of document from the Type drop-down list.
- Enter a Description of the document being added.
- Select the Browse button to locate the file on your computer.
- Confirm the file is the correct file you want to upload.
- Select Upload.

The attachment has now been added to the PAR response.

Select Review and Submit.
Submit Response
Review all of the PAR response details and select Submit.
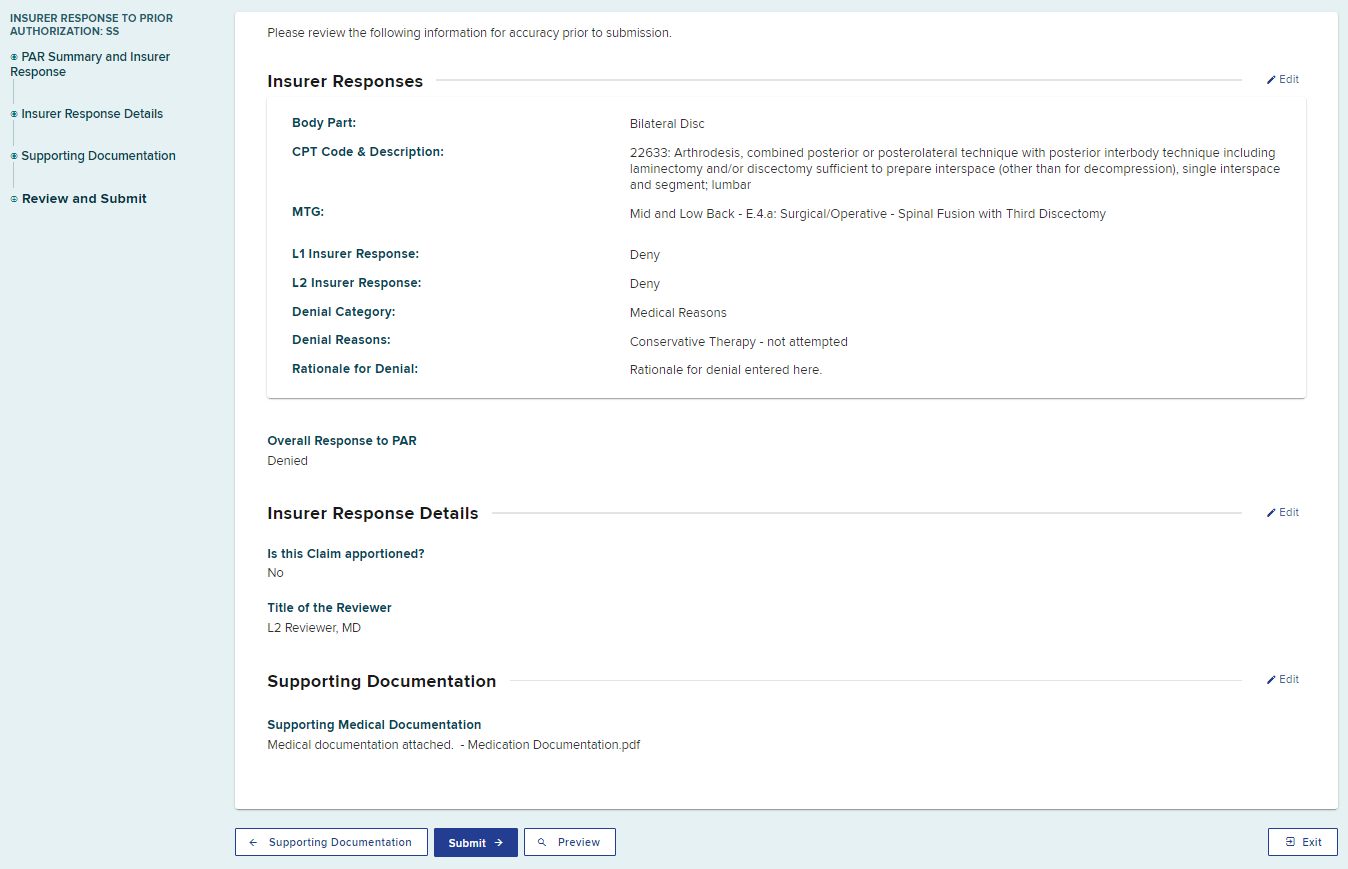
After the submission, a confirmation page will show the PAR was denied. You can print, download, or view the complete eForm.
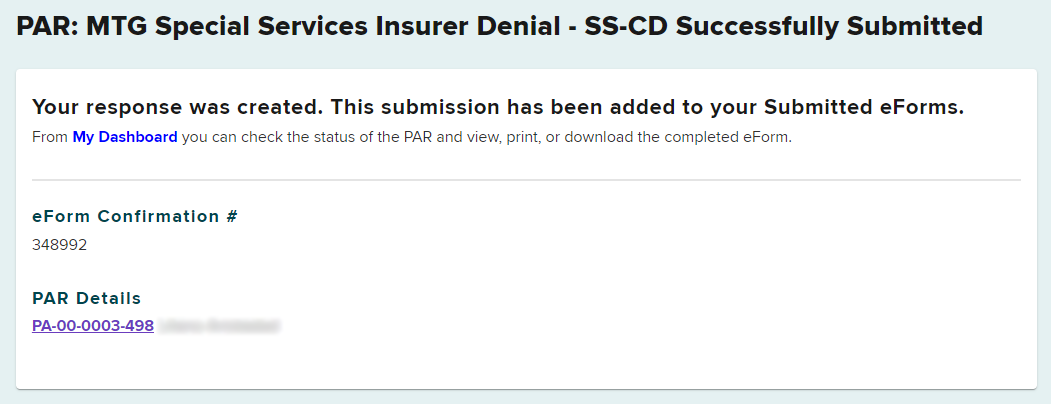
The PAR row will no longer appear on the My PARs tab.
The PAR response will show on the Submitted eForms tab.

Once a PAR you have responded to receives a final determination due to the PAR not being eligible for escalation; the provider chooses not to escalate a decision made by the payer; or the Board’s Medical Director’s Office issues a Notice of Resolution, the PAR will appear on the Prior Auth > Resolved tab.
